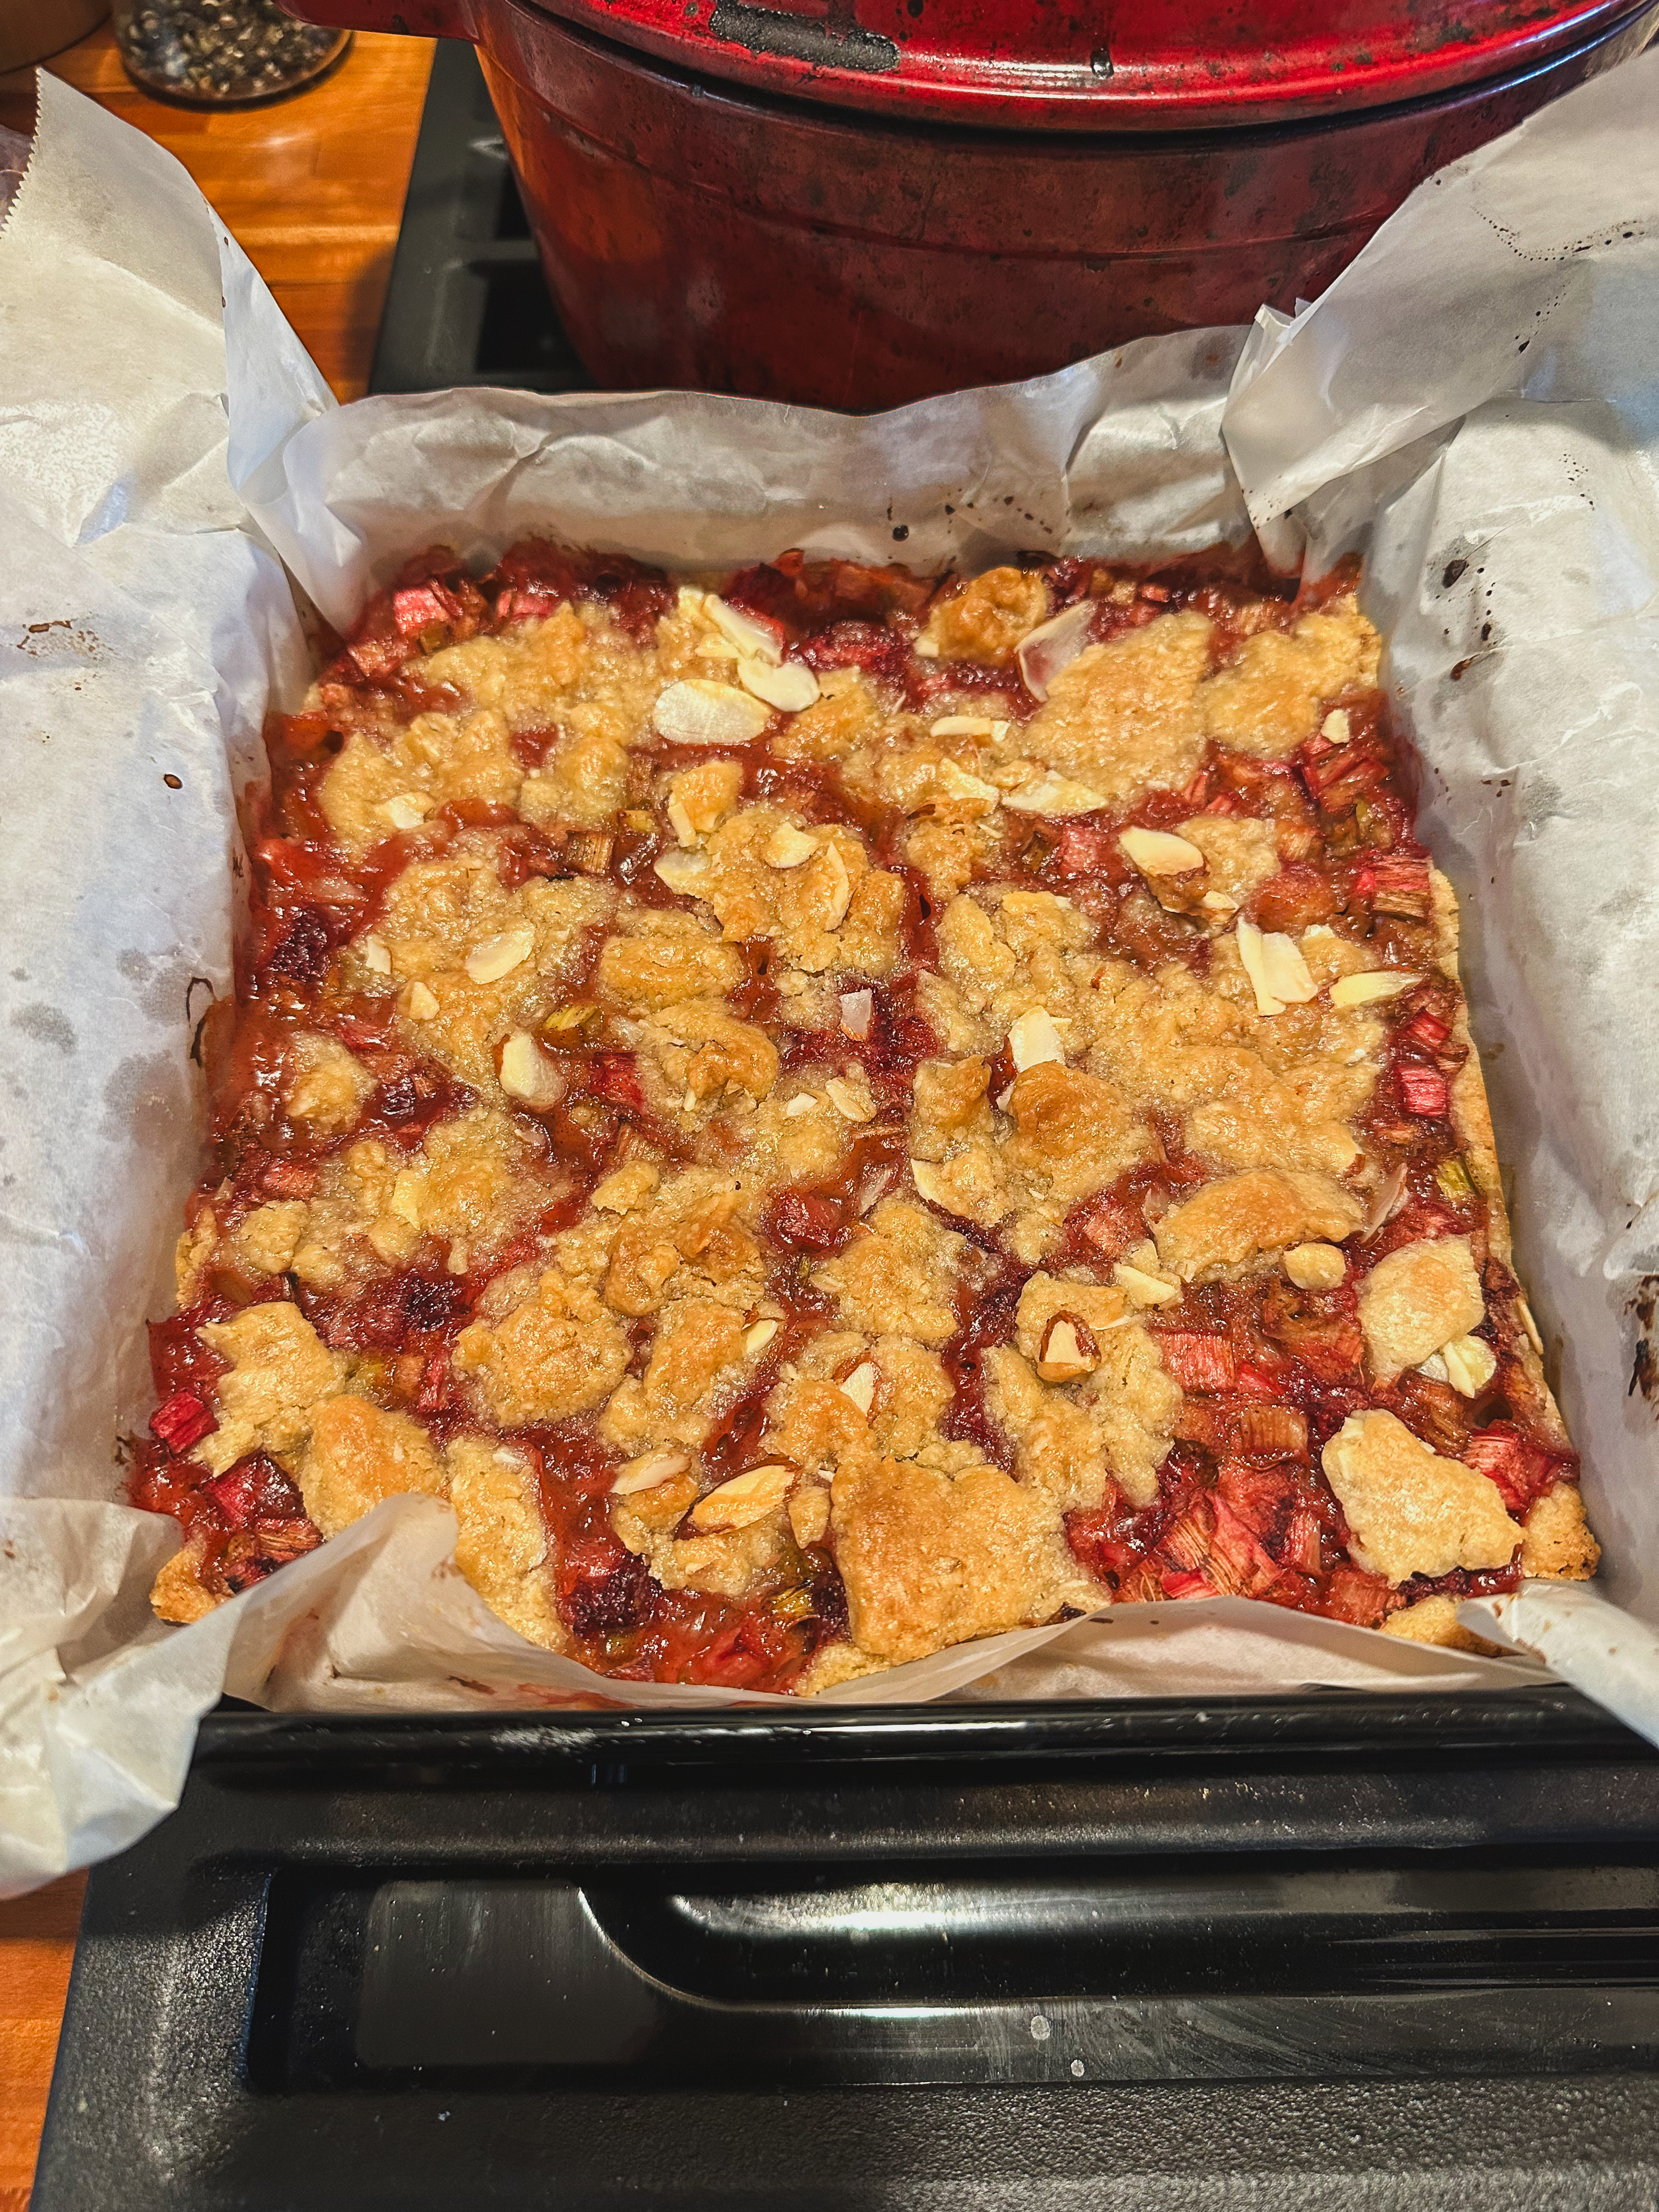
Crispy Fried Chicken

Next to cheese fries and a few other amazing things, fried chicken is up there in my top 5 favorite foods. There is nothing better than that perfect crispy breading, and juicy meat, and you can’t forget all the delicious sides that go along. I found this Hot Honey at ALDI and I knew I had to have it with some fried chicken. I learned a life-changing trick from Meg’s Everyday Indulgence that makes sure the breading stays on the chicken while frying. I make this after pickle brining the chicken for 24 hours. You can always omit that or marinade with buttermilk. Serve this fried chicken up with your favorite sides, like mac & cheese, french fries, or a side salad.

Ingredients

  • 16 oz Pickle juice
  • 1 Cup Water
  • 2 Smashed Garlic for Brine
  • 1 LB Chicken cut of choice, I used drumsticks, can use thighs or breast
  • 3 Large Eggs
  • 1/3 Cup Water
  • 1 Cup Hot Sauce
  • 4 Cups All-Purpose Flour
  • 1 TSP Salt
  • 2 TSP Pepper
  • 2 TSP Paprika
  • 1 TSBP Cayenne Pepper
  • Berryhill Hot Honey [can buy at ALDI]
  • Peanut or Vegetable Oil for fryer

Let’s Get Cooking

In a large bowl, place the pickle juice + garlic + 1 cup of water and add in the chicken. Cover with foil and place in the fridge to rest for 24 hours. Drain chicken from brine and pat dry when ready to use.

In a bowl, whisk together the eggs + water + hot sauce and set aside.

On a large plate, whisk together flour + salt + pepper + paprika + cayenne.

Dredge the chicken in the flour, then egg wash, then flour again and place the chicken on the wire rack or baking pan and let rest in the fridge for 30 minutes. Meg ensures that this allows the breading to stick to the chicken and she is absolutely right!

Heat the frying oil to 350F and work in batches frying the chicken for about 15-18 minutes or until cooked through.

Drizzle over with hot honey when warm and enjoy.

Made with Love,

Hannah

Fall Tortellini Skillet

When I make lunches for the week I love a dish that can be thrown together in one pan and be done. This recipe from Julia’s Album features roasted fall vegetables and chicken that makes for a perfect one-pan meal. I changed up the spices a little on the butternut squash, taking inspiration from my dad’s “Crack” Roasted Butternut Squash. Just because it’s your lunch for work doesn’t mean it has to lack flavor. For one person, this makes more than enough for 5 days.

Ingredients

  • 3 Cups Butternut Squash, peeled, seeded, cubed
  • Olive Oil
  • 1 TBSP Chili Powder
  • 1 TBSP Nutmeg
  • 1 TBSP Cinnamon
  • 1 TBSP Ginger
  • Honey
  • Salt + Pepper
  • 12 oz Brussel Sprouts [I used frozen Brussel sprouts, you can roast them off if you’d like]
  • 9 oz Cheese Tortellini
  • 1 lb Chicken Breast, cubed
  • 1 TSP Smoked Paprika
  • 2 TBSP Olive Oil
  • 3 TBSP Butter
  • 5 Garlic Cloves, minced
  • Fresh Thyme

Let’s Get Cooking

Start with preheating the oven to 400F.

In a large bowl toss together the butternut squash + 1 TBSP Olive Oil + Chili Powder + Nutmeg + Cinnamon + Ginger + Salt + Pepper + drizzle with honey. Once coated well, spread on a lined baking sheet and roast for about 30 minutes.

You can roast off the brussels sprouts, cut the ends off and in half, with olive oil and salt and pepper for 20-30 minutes in the 400F preheated oven with the squash. I used frozen brussels sprouts in the microwave to save some time.

Bring a large pot of water to a boil and cook the tortellini per package instructions. Drain and set aside.

In a skillet, add the 2 TBSP of olive oil. Add in the chicken breast when the oil heats. Season the chicken with paprika + salt + pepper. Cook the chicken through and remove from the pan when done.

To the same skillet add butter + 1 TBSP Olive oil + garlic, and cook until garlic softens. Add in the cooked tortellini and coat with butter. Add in the roasted vegetables + chicken and mix until everything is well distributed.

Top with fresh thyme and enjoy.

Made with love,

Hannah

Cooking with Friends: Claire/Alison Roman’s Pantry Pasta

I came to see Harry Styles for his first night in Chicago on Thursday, as I landed, I learned that it was postponed until Monday. After my emotional breakdown at the airport and I changed my whole life around, I decided to stay until Monday to see my man. Thanks to the generosity of my friend Claire, I stayed with her all week and she introduced me to Alison Roman. Not sure if I was living under a rock, but I am so happy to learn about her because she has some beautiful recipes. We decided to make Alison’s Pantry Pasta, with a Claire flare. I am considering this as the first post in an upcoming series on the blog; “Cooking with Friends”. These posts will showcase awesome recipes brought to me by my friends! First up we have this amazing pasta recipe that truly does utilize whatever we have in the kitchen.

Ingredients

  • 4-6 Garlic Cloves
  • 1 Lemon, Halved
  • 1/3 Cup Olive Oil
  • 1 TBSP Olive Oil + 1 TBSP Chili Oil [or just 2 TBSP Olive Oil]
  • 2 Large Shallots or 1 Medium Onion, finely chopped
  • 1 2oz Tin Anchovies [we didn’t have]
  • 2 TBSP Capers, finely chopped
  • Crushed Red Pepper Flakes
  • 12 oz of whatever Pasta you have
  • 1 Cup Herbs, Oregano, Parsley, Chives, finely chopped
  • 1 Cup Pasta Water
  • Parmesan or Pecorino for serving

Let’s Get Cooking

Grab a large pot of water and boil, season it heavily with salt

Finely chop one garlic clove and place it in a small bowl. Thinly slice the remaining garlic.

Chop the lemon in half and squeeze half into the small bowl with the chopped garlic, season with salt and set aside.

Heat the 1/3 cup olive oil in a large skillet over MED heat. Add in the shallots and thinly sliced garlic, and season with salt & pepper. Cook, stirring occasionally until lightly browned at the edges. Add in the chopped capers + crushed red pepper + anchovies [if you have], stirring to encourage everything to melt into the oil. Set aside.

Cook the pasta until just al dente. Using tongs, transfer the pasta into the skillet along with about 1 cup of pasta water. Cook the pasta, stirring often until the sauce has thickened. Add in the herbs [whatever you have] + lemon and garlic + an additional squeeze of lemon juice.

Sprinkle over some parm & enjoy!

Made with Love,

Hannah

Malted “Forever” Brownies

One of my best friends just took a job as the Director of Athlete Mental Wellness at Michigan State. We are all so freaking proud of her but going to miss her like crazy, so of course, there was a going away party involved. There is no better crowd-pleaser than brownies. It was finally time to break open Claire’s book for her ‘forever’ brownies as she claims that this is the only brownie recipe she will ever create. These brownies are extra chewy and you can add in the optional malted powder for a little extra dose of chocolate. You need an 8×8 in pan, Claire calls for preferably metal.

Ingredients

  • Butter for the pan
  • 1/4 Cup Dutch Process Cocoa Powder
  • 5oz Semisweet Chocolate [64-68% Cacao]
  • 6 TBSP Unsalted Butter, cut into pieces
  • 1/4 Cup Neutral Oil, vegetable
  • 1/2 Cup Granulated Sugar
  • 1/2 Cup Packed Dark Brown Sugar
  • 1 Large Egg
  • 2 Large Egg Yolks
  • 1 1/2 TSP Vanilla
  • 3/4 Cup All Purpose Flour
  • 2 TBSP Malted Milk Powder, optional
  • 1 TSP Salt
  • 1 Cup Milk Chocolate, coarsely chopped

Let’s Get Baking

Preheat the oven to 350F and line the pan with 2 sheets of foil, crossing one over the other and pressing into the corners. Lightly butter and set aside.

In a large heatproof bowl, whisk the cocoa powder into 1/4 cup boiling water until smooth.

Add in the semisweet chocolate + butter + oil into the large bowl with the cocoa mixture and set it over a medium saucepan filled with about 1in of simmering water, make sure the bottom of the bowl isn’t touching the water. Warm the mixture, gently stirring occasionally until the butter and chocolate are melted and the mixture is smooth. Remove the bowl from heat and let it cool until lukewarm.

Whisk in the granulated and brown sugar into the chocolate mixture. Add in the whole egg, egg yolks, and vanilla and whisk ‘vigorously’ until the mixture comes together and looks glossy and thick.

Add in the flour + malted milk powder [if using] + salt and whisk slowly until everything is combined. Add in the milk chocolate and fold in with a spatula. Scrap the batter into the prepared ban, spreading it into an even layer.

Bake the brownies until the surface is shiny and puffed, for about 25-30 minutes. [I had to bake for 35, it all depends on your oven].

Allow the brownies to cool for an hour before placing them into the fridge for another hour [allows for chewier texture]. Use the foil to lift out of the pan and cut into about 16 squares & enjoy.

Made with Love,

Hannah

Snoop Dog’s ‘Mack & Cheese’

I first off want to clarify that this is Snoop Dog’s WIFE’s, Shante Broadus’s, mac and cheese recipe. I feel that is important to point out because she deserves all the credit here. The original recipe calls for 5 cups of extra sharp cheddar. Instead, I did half with Colby-jack but you do not have to! I bought fall-shaped noodles from ALDI so I was incredibly excited to make this. I have nothing more to say about this recipe other than you need to make it and the nutmeg is game-changing.

Ingredients

  • 2 TSP Salt + more for the water
  • 1lb Elbow macaroni, or cute fall shapes
  • 2 Cups Whole Milk
  • 1 Cup Heavy Cream
  • 4 TBSP Unsalted Butter
  • 2 1/2 Cups Shredded Extra Sharp Cheddar
  • 2 1/2 Cups Shredded Colby Jack
  • 1/4 Cup All-Purpose Flour
  • 2/3 Cup Sour Cream
  • 1 TSP Cracked Black Pepper
  • 2 TSP Dry Mustard
  • 1/2 TSP Ground Nutmeg
  • 2 TSP Worchestershire Sauce
  • 1/4 TSP Cayenne Pepper

Let’s Get Cooking

Preheat the oven to 400F. Lightly butter a 9×13 in baking dish.

Bring a large pot of water, heavily salted, to boil. Add in the macaroni and cook 1 minute less than the package instructions. Drain and set aside.

In a small saucepan over MED heat, combine the milk and cream and gently heat. Be careful not to boil.

While the milk heats, in a large skillet over MED heat, melt the butter. Sprinkle the flour and whisk constantly for 2-3 minutes. Gradually add in the warmed milk. Cook for 2 minutes whisking frequently or until thickened. Adjust the heat as needed so the milk does not boil.

Gradually add in half of the Colby jack and half the cheddar cheese. Whisk until fully incorporated and smooth. Add in the sour cream and whisk until smooth. Add in pepper + dry mustard + cayenne + Worcestershire sauce + nutmeg. Season with salt.

Add the cooked macaroni to the cheese sauce and stir until combined. Spoon the mixture into the buttered dish and top with the remaining cheese. Bake for 25-30 minutes or until golden and bubbly.

Serve warm and enjoy.

Made with Love,

Hannah

Chicken + Bok Choy

I love this time of year because I LOVE FARMERS MARKETS. I go to one by me called the Hudson Farmers market which they have every Saturday at 9am. I stopped by this stand with beautiful bok choy and I thought it would be perfect with chicken and rice. I plated the dish over some sushi rice with some kimchi on the side. This recipe is for one person you can always make a little more for lunch the next day.

Ingredients

  • 1 Chicken Breast, cubed
  • 1 bunch bok choy, diced removing the ends
  • 3-6 small Carrots, diced
  • 1 Green Onion, diced
  • 2 Garlic Cloves, minced
  • 2 TBSP Soy sauce
  • 1 TBSP Rice Wine Vinegar
  • 1 TSP Fish Sauce
  • Sushi Rice
  • Kimchi

Let’s Get Cooking

In a large bowl, combine the diced chicken + garlic + soy sauce + rice wine vinegar + fish sauce, and let marinate for at least 10 minutes.

In a large skillet, add a little more soy sauce and add in the marinated chicken, cook on MED heat for at least 5 minutes.

Add in the carrots and bok choy and cook until the carrots begin to soften and the chicken is done.

Place your cooked rice in a bowl and top with the chicken and bok choy. Top with diced green onions and kimchi.

Made with Love,

Hannah

Apple Cider Doughnut Cake

I feel that apple cider unfairly takes spot #2 when it comes to fall flavors. Pumpkin always reigns supreme but I respectfully disagree. This doughnut cake from Princess Pinky Girl truly showcases that apple and cinnamon should be the real stars of fall flavors. My mom made this cake for a dinner with friends and I had to get the recipe from her to share because it may be one of my new favorite fall desserts.

Ingredients

  • 1 Box Yellow Cake Mix
  • 1 Cup Apple Cider
  • 1/4 TSP Cinnamon
  • 1/2 Cup Cinnamon Apple Sauce
  • 3 Large Eggs, room temp
  • 1 TBSP Brown Sugar
  • 1 TSP Vanilla
  • 1/4 TSP + 2 TBSP Cinnamon
  • 1/4 Cup Sugar
  • 1/4 Cup Unsalted Butter, melted

Apple Cider Glaze

  • 1 Cup Powdered Sugar
  • 1/4 Cup Apple Cider

Let’s Get Bakin’

Preheat the oven to 350F

In a large mixing bowl combine the cake mix + apple cider + apple sauce + water + eggs, and mix until well combined. Add in 1/4 TSP cinnamon + brown sugar + vanilla and mix well.

Lightly butter a bundt pan and flour it as well. Pour the cake mixture into the bundt pan and cook for 45 minutes. Once done, remove from heat and let cool for 20 minutes. Remove from the pan once cooled.

To make the glaze: combine the powdered sugar + apple cider in a small bowl. Whisk until desired consistency.

In a separate bowl mix together the cinnamon + sugar. Once the cake has cooled, brush the surface with the melted butter. Coat the cake with cinnamon sugar.

Serve the cake with the glaze drizzled over the slices.

Made with Love,

Hannah

French Loaf

I miss the local Boulangeries in France, with all the amazing pastries and warm baguettes. This recipe is from the NYT Cookbook, and I was thinking that it was for a baguette; I was very wrong. The bread is more of a sandwich bread, not as crispy and crunchy as baguettes are. This is the perfect loaf for weekend sandwiches, garlic bread, or even homemade croutons. Bread-skill wise I give this about a 2.5/5 difficulty.

Ingredients

  • 1 1/8 TSP Active Dry Yeast
  • 1/4 Cup Lukewarm Water
  • 1 Cup Cold Water
  • 2 TBSP Unsalted Butter
  • 3 1/2 Cups All-Purpose Flour
  • 1 TSP Salt

Let’s Get Bakin’

In a small bowl, blend the yeast + lukewarm water until the yeast is dissolved, let sit until foamy.

In a small saucepan, combine the cold water + butter. Heat on LOW until the butter melts.

Combine the flour + salt and mix well. Add in the yeast mixture and combine using a mixer or your hands. Add in the dissolved butter and mix until it forms a ball.

On a lightly floured surface, knead the dough quickly and gently into a ball. Place the dough ball into a buttered bowl and let rest covered for about 30-40 minutes.

After the first rise, turn out into a lightly floured surface and briefly knead and shape into a ball. Return to the bowl and cover and let rest for about 60 minutes, or until doubled in size.

After the second rise, turn the dough out onto a floured surface, roll into a loose ball, and let sit for 5 minutes.

Turn the dough seam side up and flatten with your fingers into a rough rectangle shape. Fold one-third of the dough toward the center of the rectangle, then roll it up like a jelly roll.

Transger the loaf to a baking sheet seam down and the ends folded under. The NYT says the loaf should be about 13 1/2 in long.

Cover with a clean town and let proof again for about 15-30 minutes.

Preheat the oven to 450F. Using a sharp knife cut 3 parallel diagonal slashes in the top of the dough.

Place the baking sheet into the oven and put 4 ice cubes into the floor of the oven. Bake for 5 minutes and then add an additional 4 ice cubes.

Turn the pan and bake for 10 more minues. Reduce the heat to 400F and bake for 15-20 minutes. Remove from the oven and let cool.

Use for sandwiches, make garlic bread, dip in your soup, do whatever you please with it!

Enjoy,

Hannah

“The Bear” Spaghetti Sauce

If you’re obsessed with anything food-related like me, then I am sure that you watched “The Bear” on FX. If you haven’t, go watch it ASAP. I freaking loved the show and when my dad told me that he made the pasta sauce from the final episode, I knew I had to make it for myself. My dad claims this sauce is ‘life-changing’, and he’s not kidding. I fact-checked my memory of my dad recalling the recipe using this Buzzfeed article

Ingredients

  • 1 28oz Can of San Marzano tomatoes, which can be whole peeled or already blended [I used blended so I didn’t have to mash my tomatoes]
  • 1/2 Cup Olive Oil
  • 1 Large Yellow Onion, cut in half, through the root
  • 1/2 TSP Red Pepper Flakes
  • 1/2 Stick Unsalted Butter
  • Large handful of Basil, stems & all
  • 5 Garlic Cloves, peeled & smashed
  • 1 TBSP Neutral Oil [vegetable/canola]

Let’s Get Cookin’

In a small saucepan, combine 1/2 Cup oil + garlic + 1/2 TSP red pepper flakes + basil. Turn heat to MED-LOW and let come to a boil. Simmer for 1-2 minutes/until basil is wilted. Remove from heat and let steep.

In a large pot, add the butter + TBSP neutral oil, and allow to melt. Slice the onion through the root and peel off the skins. Once the butter is melted and beginning to brown, add in the onion halves cut-side down. Allow to sear for 2-3 minutes – as they begin to turn golden brown.

Add in the can of tomatoes, slowly, into the butter and oil, BE CAREFUL OF SPLASHING. Crush up your tomatoes if you used whole tomatoes. Bring up to a boil and season with salt. Let simmer for 20-25 minutes.

Once the infused oil has cooled, place in a blender and blend until the garlic and basil is chopped. Combine the oil into the tomato sauce and let simmer for 10 more minutes. Season with additional sauce if needed.

Serve with your favorite pasta, and don’t forget to reserve some of that pasta water to use when you are combining the sauce & pasta.

Made with Love,

Hannah

P.S don’t forget the garlic bread + meatballs + a good glass of wine.

Snoop Dog’s Cornbread Muffins

It’s September! Cozy meals are now on the menu and I am so stinkin’ excited. Hearty Chili’s, big pots of soup and stock it’s my favorite kind of food. Along with your chili, you need a little something extra to soak up all that goodness. In comes Snoop Dog’s cornbread muffins. To be honest I ate these warm with some honey on them and it’s really all you need. All I have to say is Snoop Dog knows what he is doing, check out his cookbook!

Ingredients

  • 1 Cup All-Purpose Flour
  • 2/3 Cups Yellow Cornmeal
  • 1 1/2 TSP Baking Powder
  • 1/2 TSP Salt
  • 1/4 TSP Baking Soda
  • 4 TBSP Unsalted Butter, @ room temp
  • 1/4 Cup Sugar
  • 2 Large Eggs
  • 1/2 Cup Whole Milk
  • 2/3 Cup Full-Fat Plain Yogurt/ Sour Cream [I used non-fat greek yogurt and they turned out amazing]

Let’s Get Bakin’

Preheat the oven to 425F and line the muffin tins with paper liners or butter them.

In a small bowl combine the flour + cornmeal + baking powder + baking soda + salt

In a larger bowl combine the butter + sugar and beat on medium speed until creamy. Add in the eggs and beat until blended – stir in the milk + sour cream/yogurt.

Slowly add the dry ingredients to the wet ingredients a little at a time. Mix on low or until just combined – the batter should be thick.

Spoon the batter unto the muffin tins about 3/4 full.

Bake for 16-18 minutes, rotating the pan halfway through. They should be golden-brown when done.

Serve warm with chili or honey or with whatever you want. Store in a ziplock bag or in the freezer for a few months.

Made with Love,

Hannah