Pickle-Brined Chicken Sandwich

With our local Chic-Fil-A being shut down for a good part of 2 months now, I needed my chicken sandwich fill. I decided since I can’t get one there, I can just make it myself, without all the extreme beliefs attached. I got this idea after having some leftover pickle juice, instead of throwing it out, I decided to brine some chicken breast in it overnight. It may have been my best idea yet. Serve with french fries and you can leave out the ‘my pleasure’.

Ingredients

  • 2 Chicken Breast
  • 32 oz Pickle Juice, I used Grillos, but Claussen’s would also be good, or just whatever you have, I’m a pickle snob
  • 2 Cloves Garlic, smashed and roughly chopped
  • Handful fresh dill
  • 1/2 Cup Flour
  • 1/3 Cup Cornmeal
  • 1 TBSP Chili Powder
  • 1 TSP Paprika
  • Salt & Pepper
  • 2 Eggs
  • 1/2 Cup Vegetable/Canola Oil, enough to cover the pan
  • Lettuce
  • Tomato, Sliced
  • Pickles, Sliced
  • Mayo

Let’s Get Cooking

We are brining overnight, if you can’t do 24 hours, I would recommend at least 3. Pour the pickle juice into a large bowl, and add in the extra garlic + dill + washed and dried chicken breast. Cover the bowl with foil and place in the fridge overnight.

After the bringing, take the chicken out, rinse it off and pat dry.

Whisk two eggs in a bowl and set aside. On a plate mix together flour + cornmeal + paprika + chili powder + salt + pepper.

In a large pan with high sides, add in the oil and heat on MED-HIGH.

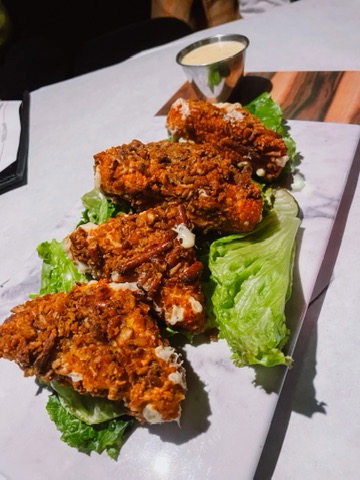
While the oil is heating, dredge the chicken, first in the egg then flour, making sure the chicken is fully covered. Once the oil is hot, carefully add in the chicken, cooking for about 3-4 minutes on each side.

When the chicken is fully cooked, remove it and place on a paper towel-lined plate. Let rest.

Prepare the toppings, toast your buns and cut the tomatoes, pickles, and wash the lettuce.

Build your perfect sandwich: bottom bun, lettuce, chicken, pickles, tomatoes, mayo, top bun.

Made with Love,

Hannah

Buttermilk Biscuits

This week is all about the New York Times Cookbook I guess because here I am with another recipe from it. I had been eyeing up this recipe because I freaking love a biscuit for breakfast. Top it with eggs, jam, ham, and bacon, the list is extensive. This recipe is incredibly easy and I feel that they are 2 key things with making biscuits, don’t overwork the dough, and don’t roll it out too thin. I rolled my dough out a little too thin, but you still get the flakes if you accidentally do too.

Ingredients

  • 2 Cups Sifted All-Purpose Flour
  • 1 TSP Salt
  • 1/2 TSP Baking Soda
  • 1 TSP Baking Powder
  • 4 TBSP Vegetable Shortening [I used unsalted butter]
  • 3/4 Cup Buttermilk, more if needed. [if you don’t have buttermilk you can do 1 Cup Milk + 1 TBSP White Vinegar]

Let’s Get Bakin’

Heat the oven to 500F

Sift the dry ingredients together into a large bowl. Cut the butter into the dough with 2 knives until the mixture resembles coarse cornmeal.

Add enough buttermilk to produce a soft dough, stir until the mixture forms a ball.

Knead lightly in the bowl until the dough holds together, for about 30 seconds.

Turn the dough out onto a floured surface and roll to about 1/4 inch thick.

Cut out biscuits with a small biscuit cutter, any round cookie cutter will do.

Bake for 12 minutes.

Serve with whatever toppings you like. I love them with honey right out of the oven.

Made with Love,

Hannah

Coconut Chicken Tikka Masala

I adore Indian cuisine, however, sometimes I am wary to make it on a weekday due to it taking time. I never want to rush through a recipe and lose the beautiful flavor profile that comes with Indian dishes. This recipe from Half-Baked Harvest is the perfect weekday dish. You get all the flavor in half the time! It also makes a bunch if it’s just one person, like me, so I had lunches for work for the remainder of the week!

Ingredients

Curry Paste

  • 1 Medium Yellow Onion, quartered
  • 1 Shallot, halved
  • 6 Garlic Cloves
  • 2 (1-inch) pieces of fresh Ginger, peeled
  • 3 TBSP Garam Masala
  • 2 TSP Ground Turmeric
  • 2 TSP Salt
  • 1 TSP Crushed Red Pepper Flakes
  • Zest of 1 Lemon

Chicken

  • 2 LBS Boneless Chicken Breast, cubed
  • 1/2 Cup Full-Fat Plain Greek Yogurt
  • 1 14oz Unsweetened Coconut Milk, full-fat
  • 6 oz Tomato Paste
  • 1/4 Cup Cilantro, chopped
  • 3 Cups cooked Rice, for serving

Let’s Get Cooking

Make the paste by combining all of the curry paste into a blender. Pulse until a smooth paste forms, about a minute. I had to scrape the sides and blend it a few times.

To make the chicken, in a large bowl or zip lock bag, combine 2 TBSP of the curry paste + the chicken + yogurt. Steal the bag and ensure all the chicken is covered, or if in a bowl mix well and cover. Marinate at room temp for 30 min or refrigerate over night.

In a large skillet, add in the remainder of the curry paste and cook for about 1 minute. Add in the chicken + coconut milk + tomato paste and stir to combine. Cover and let cook for 15-20 minutes. Remove the lid and let simmer, about 5 minutes more.

Stir in the cilantro.

Serve the chicken with rice and naan.

Made with Love,

Hannah

Cucumber Dill Chicken Salad

You would be lying if you said that chicken salad wasn’t one of the most perfect picnic foods. You can eat it on a croissant, but my favorite is with kettle-cooked potato chips, ugh it’s the perfect crunch. This recipe from PBFingers gives chicken salad the perfect twist, adding in the yogurt and cucumber. It’s incredibly refreshing and great in lettuce wraps for lunch!

Ingredients

  • 3 Cups Rotisserie Chicken, chopped and chilled
  • 2/3 Cup Greek Yogurt, I used low-fat, she recommends full-fat, do what you like
  • 1 TBSP Dijon Mustard
  • 1/2 Lemon, Juiced
  • 1/3 Cup Green Onion, chopped
  • 3/4 Cup Seedless Cucumber, finely chopped
  • 1/2 Cup Celery, chopped
  • 1/4 Cup Fresh Parsley, chopped
  • 1/4 Cup Fresh Dill, chopped, she used dried dill but I think fresh provides a better flavor
  • 1 TSP Sea Salt
  • LOTS OF GROUND PEPPER

Let’s Get Cooking

Remove the chicken from the bones and finely chop, place into a large bowl.

Mix all of the ingredients together well.

Easy, peasy, that’s it. Serve on bread, lettuce, or with your favorite potato chip.

Made with Love,

Hannah

IRL. Miso Ramen Kit

May is Asian and Pacific Islander Month and what better way to celebrate a culture than through their food. I was at ALDI the other day and found these Ramen kits from IRL Food. They had spicy chicken and this miso ramen, I picked up both because they looked so good. I used Budget Bytes as a source to spice up my ramen kit and make it a proper meal. It was incredibly easy to put together and the miso broth from the kit was DELICIOUS. I can’t wait to taste the spicy chicken.

Ingredients

  • Ramen Kit
  • 1 Egg
  • Scallions, diced
  • Ginger
  • 1 Garlic Clove, minced
  • Spinach
  • Hot Sauce
  • Olive Oil

Let’s Get Cooking

The kit starts off by bringing the broth to a low boil.

While that’s heating up, in a skillet saute garlic + zested ginger with the olive oil. Once that becomes fragrant, add in the spinach and cook until wilted.

Once the broth has come to a boil, add in the noodles. Break the noodles up with a fork. Let that boil on low for about 2 minutes.

Turn down to a low simmer and crack an egg into the broth. Let it cook enough that the white is fully cooked but the yolk is still soft.

Once done, pour into a bowl, and top with spinach + scallions + a few dashes of your favorite hot sauce!

Enjoy and be sure to give your support to local Asian-owned businesses!

Made with Love,

Hannah

Hashbrown Avocado Toast

We all remember when Avocado toast became all the craze a few years ago, and rightfully so. It’s the perfect breakfast, especially topped with a beautifully done egg. I found this recipe from @Kelseysfoodreviews on Tik Tok where she used a hashbrown as the toast. I saw some frozen hashbrown’s at ALDI the other day, and I had to make this. I had it for breakfast and OMG, it’s silky, it’s crispy and very satisfying.

Ingredients

  • 1 Frozen Hash Brown
  • 1/2 Avocado Mashed
  • 1 Egg
  • Crushed Red Pepper
  • Salt + Pepper
  • Lime Juice
  • Olive Oil

Let’s Get Cooking

Cook the hashbrown per package instructions, and make sure it is extra crispy.

While the hash brown is cooking, mash the avocado in the bowl with some red pepper flakes + lime juice + salt + pepper.

In a skillet, drizzle olive oil in a pan and heat on MED.

Crack the egg in the skillet and fry until the whites are fully cooked.

Once the hashbrown is done, top with the mashed avocado and fried egg.

ENJOY

Made with Love,

Hannah

Akron Eats: Alexander Pierce

I haven’t done a restaurant review in a while, which makes me sad because trying out new places is one of my favorite hobbies, if you could call it that. I had seen Alexander Pierce on Yelp for quite some time, but it looked like a fancy place and I felt that I needed a special occasion to go. I decided that my birthday at the beginning of April was the perfect time to go. I made reservations weeks in advance, I would recommend this big time!

When I tell you this place is nice, whoooa it’s nice! Private lounge, live singer, you can even get a membership there. The restaurant entrance is located at the back of the building. When you pull up you don’t even realize it’s a restaurant. Then you see the big iron gate with ‘Alexander’ written on it and the beautiful entrance. We were seated quickly and the server was incredibly nice.

When you come to a restaurant like this you have to go all out and that’s what we did.

The pretzel-crusted fried pepper jack was a special at the time, but if it is on the menu when you go ORDER IT. It’s salty, it’s spicy, and it’s the ultimate savory bite. Do not get me started on this meatball. It’s stuffed with gooey cheese, served with a delicious sauce and toasted bread. It could be a meal itself. I recall saying about 10 times ‘this is the best meatball I’ve ever eaten’. And that’s not hyperbole, I truly believe that it was. Onto the main entree, the ribeye. OH MY GOD. I am a med-rare girl, but at some places you go, that means medium or well. That’s not what I want, no no. Alexander Pierce did this ribeye so right, I can’t even do it justice. I added the peppercorn demi-glace, it did not even need that. The steak was so perfectly done that its juices were the only sauce I needed, that’s how you know a steak is done right.

If you are looking for a fancy night out, friends get together, date night, or whatever it is, please check this place out. I think it should be a staple in Akron dining. You could pick this restaurant up and put it in any big city and it would stand out, but I am happy that it is standing out here in Akron, OH.

Eaten with Love,

Hannah

The Rattlesnake Mac & Cheese

I love a charcuterie board and trying out new and interesting cheeses. Recently, I came across this Tequila Habanero Cheese from DeerCreek called The Rattlesnake. So obviously I had to try it out. It’s a delicious and creamy sharp cheddar with a kick of habanero. It’s definitely hot, but it has an amazing flavor. With a cheese this amazing I had to try and incorporate it into other dishes, so obviously I made mac & cheese. It’s spicy, it’s creamy, and it’s definitely cheesy.

Ingredients

  • 1 Clove Garlic, finely diced
  • 1 1/2 TBSP Butter
  • 1/2 Cup Heavy Whipping Cream
  • 3/4 Cup Milk
  • 2 TBSP Flour
  • 5 TBSP Cream Cheese
  • 1 1/2 Cup Rattlesnake Cheese
  • 1 Cup Sharp Cheddar + more for on top
  • 8 oz Macaroni Noodles
  • 2 32 oz Chicken Broth

Let’s Get Cooking

Bring the chicken broth to boil and cook the macaroni noodles per box instructions. Strain and put to the side.

Preheat the oven to 425 F

In a large pot, on MED HIGH melt the butter and add in the garlic. Add in the flour and stir well, making sure all the flour is coated. Turn the heat down to LOW and slowly add in the heavy cream + milk, stirring as you pour in. Add in the cream cheese + rattlesnake + cheddar [save some for on top].

Stir to make sure all the cheese melts. Once all the cheese is melted, add in the cooked and strained noodles. Stir to combine.

Pour the mac and cheese into a non stick pan and top with the extra cheddar cheese.

Bake for 20-25 minutes or until golden brown on top.

Made with Love,

Hannah

Kimchi Burger

As we’ve seen from my recent postings, I’ve been wanting to put Kimchi in just about everything I can. I’m late to the party in being obsessed with it I know. But it’s packed with such good probiotics, and as a girl with gut issues, how can I not love it. I love using burgers as a medium to fuse different cuisines together, it’s the perfect mix of silky egg, and spicy kimchi.

Ingredients

  • 4 Burger Buns
  • 1 LB Ground Beef
  • Romaine Lettuce
  • 4 Eggs, Fried
  • 4 Slices Sharp Cheddar Cheese
  • 1 Cup Kimchi, split amongst the 4 burgers
  • Salt & Pepper
  • Olive Oil

Let’s Get Cooking

To make your burger, grab a slice of cheese and place it in the middle of the ground beef, form the burger around the cheese. Place on a plate once formed and season both sides with salt and pepper.

Cook your burgers to your liking, I go med-rare so about 6/7 minutes each side. While the burgers are cooking, grab a small frying pan and fry up the eggs in a small amount of oil. Once done, remove from the pan and place on a paper towel.

To build the burger start with the bottom bun, lettuce, burger, kimchi, fried egg, then top bun.

Serve with fries or whatever you enjoy.

Cacio e Pepe

I’ve been wanting to make this recipe for a little while and I finally had all the ingredients in my pantry this week. This pasta dish is incredibly simple, focusing on the two stars of the show, cheese and pepper. I followed Bon Appetit’s recipe for this dish.

Ingredients

  • 6 oz Pasta, your choice
  • 3/4 Cup Pasta Water
  • 3 TBSP Unsalted Butter, cubed, divided
  • 1 TSP Fresh Cracked Pepper
  • 3/4 Cup Grated Parmesan
  • 1/3 Cup Grated Pecorino

Lets Get Cooking

Bring water to a boil and season with salt. Cook the pasta per package instructions, making sure it’s just to al dente. Reserve 3/4 cup pasta water.

In a large skillet melt 2 TBSP butter. Add in the pepper and lightly toast for about 1 minute.

Add 1/2 cup of the reserved pasta water to the skillet and bring to a simmer. Add in cooked pasta + remaining butter.

Reduce heat to low and add in the cheeses until they melt. Add in the extra pasta water if the sauce seems dry.

Serve & enjoy!

Made with Love,

Hannah