No one wants a lame salad at work. I am not one who enjoys getting like a rabbit, but I understand some people like it. Anyway, lets spice up this salad with some steak and pretty much whichever toppings you enjoy. Idea and recipe for the Balsamic dressing comes from Longbourn Farm.
Ingredients
Salad greens of your choosing
Steak, I used 2 smaller cuts I found at the store
Cherry Tomatoes, sliced
Cucumbers, quartered
Red onion, sliced into ribbons
Green Onions
Goat Cheese [or cheese of your choosing]
Salt + Pepper
For Dressing:
1/2 Cup Olive Oil
1/4 Balsamic Vinegar
1 TSP minced garlic
2 TSP Honey
1 TSP Dijon Mustard
1/2 TSP Salt
1/4b TSP Pepper
Let’s Get Cooking
Heat a skillet on the stove to MED-HIGH heat. Cook the steak to your liking, I prefer med-rare so I went about 4 min per side. Remove steak from heat and LET IT REST! That part is important, this allows the juices to reabsorb and not get lost in the process of immediately cutting it.
Prep the rest of your ingredients and throw into a large bowl.
Combine the dressing ingredients in a closed container and shake to mix.
Cut the steak into strips once cooled and add to the salad. Place in your separate containers for lunches and keep the dressing on the side, or dress and serve immediately.
Julia Child is the end all be all. I received her both volumes of her cookbook Mastering The Art of French Cooking for Christmas one year and they are both something I would grab if my house was on fire. This recipe is all homemade, from the tart shell to the apple filling. This will 100% impress your friends and family when you present this. Be ready to set some time aside, but it is totally worth it.
Ingredients
Pastry Shell:
2 Cups Sifted All-Purpose Flour
1/2 TSP Salt
2 Pinches of Sugar [her words not mine]
1/4 lb Chilled Butter cut into 1/2 in cubes [again this is where a kitchen scale really comes in handy]
3 TBSP Chilled Vegetable Shortening
5 TBSP Cold Water
Apple Tart
4 lbs Crisp Cooking apples, I used half granny smith and half honeycrisp hybrid
1 TSP Lemon
2 TBSP Sugar + 2/3 Cup
1/3 Cup Apricot Preserves, forced through a sieve
1/4 Cup Calvados, Rum, or Cognac [can substitute for a TBSP of Vanilla extract]
3 TBSP Butter
1/2 TSP Cinnamon & grated rind of 1 lemon/orange
Let’s Get Baking
I love Julia Child, but jeez her recipes can be unnecessarily complicated so I am going to do my best to make this simple.
We are going to start with the pastry shell. You are going to add together the flour + salt + sugar + butter + vegetable shortening into a large bowl. Using the tips of your fingers, rub together the fat until it has broken into small pieces. Don’t worry about them getting incredibly small they will blend more later.
Slowly add the water and blend the mixture with the other hand. The goal is to gather the dough into a large mass. Sprinkle up to another TBSP more of water over any parts that have not added to the main ball of dough. Press the dough into a firmly shaped ball, it should hold together but not be sticky.
Lightly flour a cutting board and with the heel of one hand, rapidly press the dough down onto the board. I did this a couple times to fully incorporate the butter. Scrape together all the dough and knead it slightly into a smooth ball. Cover with wax paper and place into the fridge for an hour, or freeze up to 3 days.
When it’s time to bake the shell, preheat the oven to 375F. Carefully roll out the shell into a 10inch circle. Gently place the shell into a tart pan and press down until the pastry fills the tin. Cook for 5-6 minutes. Then remove the shell, prick the bottom of the shell with a fork and bake for about 8-10 minutes more. The shell will remove slightly from the mold and will brown.
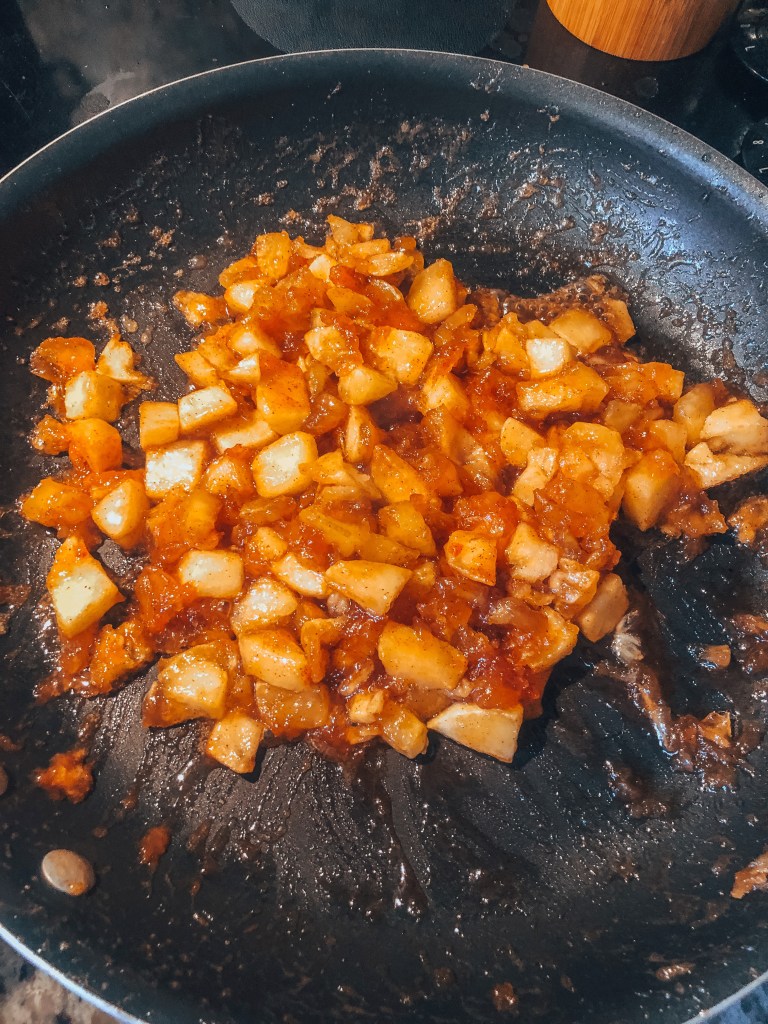
Now onto the apple tart. You are going to quarter, core, and peel all of the apples. Cut the apples into about 1/8 inch slices, enough for about 3 cups. I recommend using a mandolin. Once you have 3 cups, add in the lemon juice and 2 TBSP of sugar, mix together and reserve for the top.
The rest of the apples will be cut into rough slice, about 8 cups. Add the apples into a pan and cook covered on low heat for about 20 minutes. Stir here and there until tender. Beat the remaining ingredients into the pan, including the remaining 2/3 cups of sugar. Increase the heat until it bowls and is thick enough to hold a mass on the spoon.
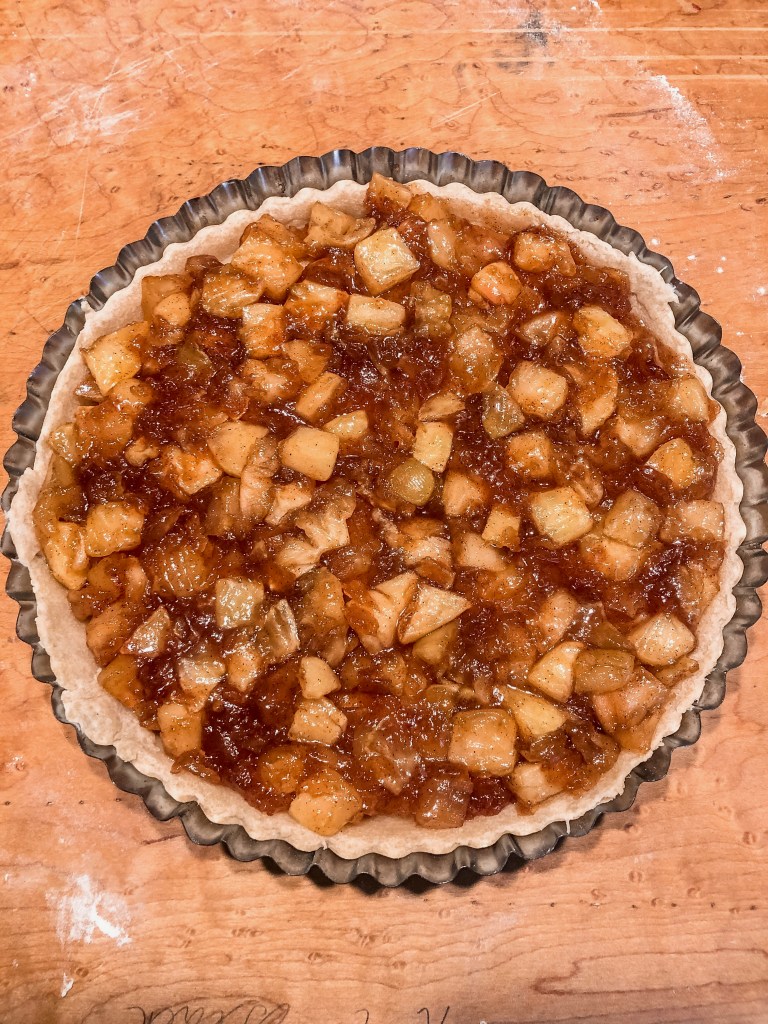
Preheat the oven to 375. & spread the apple sauce on the precooked pastry shell.
Cover the applesauce with the left over apples in concentric circles. Top off with some of the apricot glaze and bake for 30 minutes.
Remove and place on a cooling rack, service warm or cold.
I say warm with vanilla ice cream is always the way to go.
So you want to make croissants, I understand the desire. Croissants are so perfectly buttery and flaky you can’t resist them. I decided to dedicate 3 days to make these croissants before a camping trip with friends. These croissants can be used for breakfast sandwiches, which is how I used them, or plain. I also have a chocolate croissant recipe that you can check out here!
But anyways, let’s get going on the croissants. I used The Weekend Bakery’s recipe, it is extremely detailed and helpful. I do recommend before you get started that you have 3 days set aside and a kitchen scale!
Ingredients
500 g Unbleached All Purpose Flour
140g Water
140g Whole Milk
55g Sugar
40g Solt Unsalted Butter
11g Instant Yeast
12g Salt
280g COLD Unsalted Butter for laminating
1 egg + 1 tsp water [egg wash]
Let’s Get Laminating
Since you are laminating butter into dough you need to make sure that not only is the butter very cold but also the room you are working in. Your butter will quickly melt, ruining the croissants.
Day 1
Combine all the dough ingredients, 500g flour + 140 g water + milk + 55g sugar + 40g soft unsalted butter + 11g instant yeast + 12g salt.
If you have a mixer, mix together at low speed for about 3 minutes. If you’re like me and don’t have a mixer, mix with a wooden spoon until the dough comes together, then continue to knead lightly for 3 minutes. Shape the dough into a disc , place on a plate, cover and refrigerate overnight.
Day 2
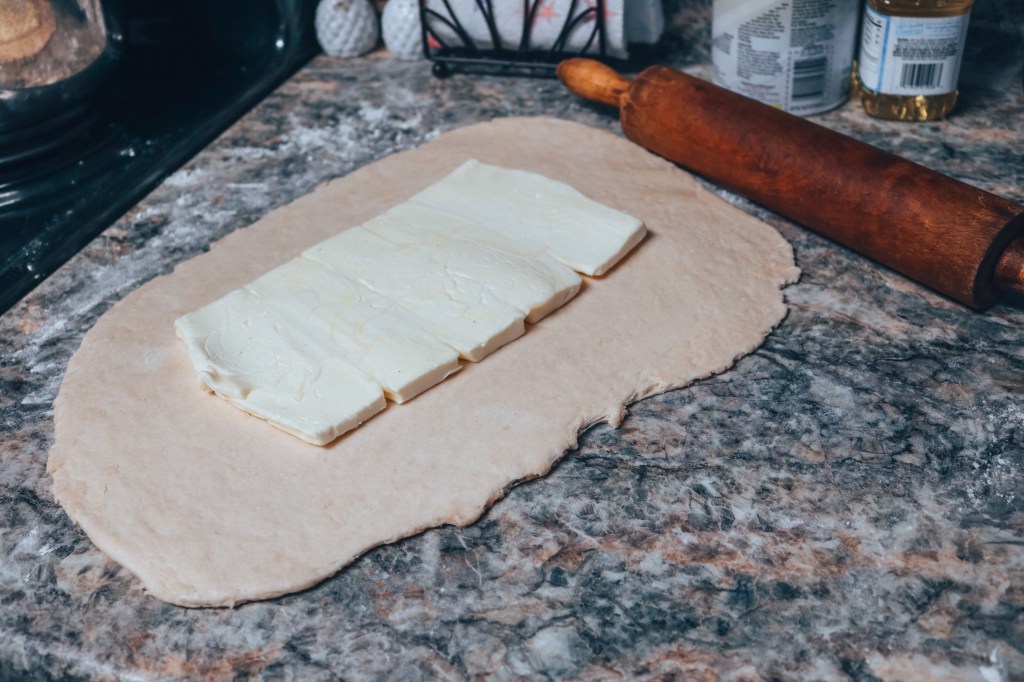
Time to get to work: grab your cold butter and cut lengthwise into equally thick slabs. Place the butter on wax paper to form a square. Place another piece of wax paper overtop and pound down the butter with a rolling pin until the square is about 17cm x 17cm. Wrap up the butter and place back into the fridge.
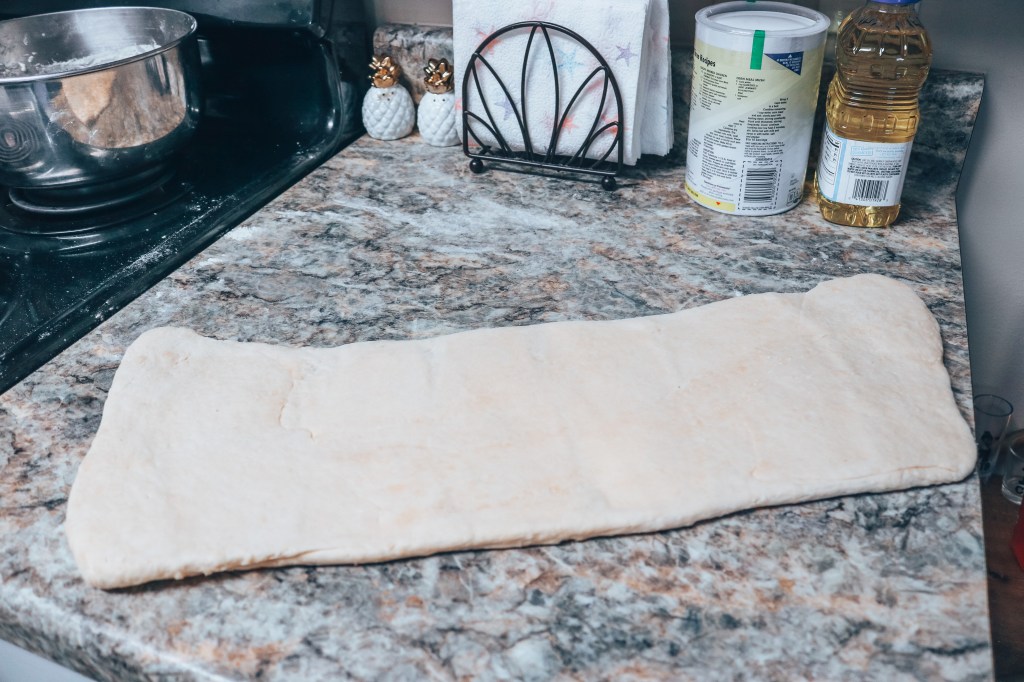
Flour the surface and roll out the dough from the fridge. Try and roll the dough out into a square of even thickness. Grab the frozen butter slab and place onto the dough. Fold the dough over the butter so the butter is encased into the dough.
Roll the dough out now, starting from the center of the dough towards the edges. You want to lengthen the dough instead of making it wider. Once long enough, fold the dough letter style, one flap over the other, cover, and refrigerate for 30 minutes. Before rolling, turn the dough 90 degrees, making sure the open end of the dough is facing you. Repeat this step of rolling and folding 3 times, this gives your croissants the perfect layers. Once doing this 3 times, place back into the fridge overnight.
Day 3
Grab the dough and flour the surface you’ll be working on. Gently roll out the dough one more time. If the dough resists, take a break and put it back in the fridge.
Using a pizza wheel, mark the top of the dough at 12.5cm intervals and along the bottom mark 6.25cm. Make diagonal cuts along the top corner to the bottom. Once all the triangles are cut, gently roll out the triangle to elongate it slightly. To roll the croissant, start at the longer end, rolling tightly and then turning in the two ends.
To proof the dough: place on a baking sheet and provide the dough with a thin egg wash. Proof in a slightly warmer area of the house for about 2 hours. You will notice when they have proofed, with the croissants slightly wiggling.
Once proofed, add another coat of egg wash and preheat the oven to 385F. When the oven is heated, bake for about 7 minutes and then lower the temperature to 330F and bake for 9 minutes.
You’ll want to look for the croissants browning but not too quickly. Take out from the oven once done, let cool and enjoy! You can also freeze these croissants and reheat in the oven later!
Make sandwiches for breakfast, lunch, or dinner; or just eat by themselves!
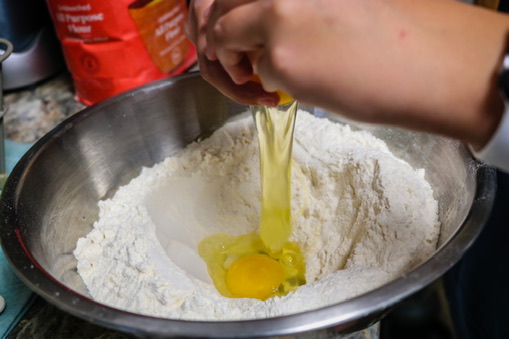
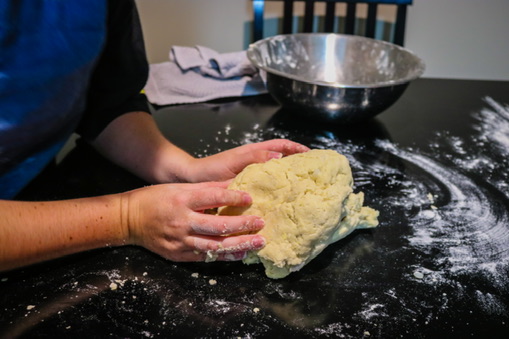
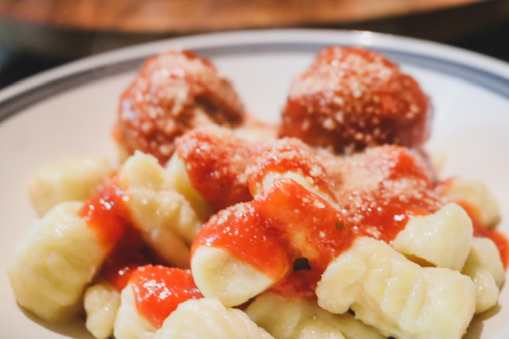
Pasta is a fall favorite, I mean we all start to crave carbs when the sun starts to go down sooner. My roommate and bestfriend decided that she wanted to make gnocchi so we went for it. Love Bakes Good Cakes provided us with a great guide on how to be pro’s. Be your own pasta granny and make homemade gnocchi with your best pals like I did!
Ingredients
2 Medium Potatoes, peeled and quartered
2 Cups All Purpose Flour
1 Eggs, Slightly Beaten
Pinch Salt
Let’s Get Cooking
After peeling and quartering the potatoes and place them in a pot of boiling water. Cook the potatoes for about 15 min, until they are able to slide off the fork. Drain the potatoes from the water and mash them.
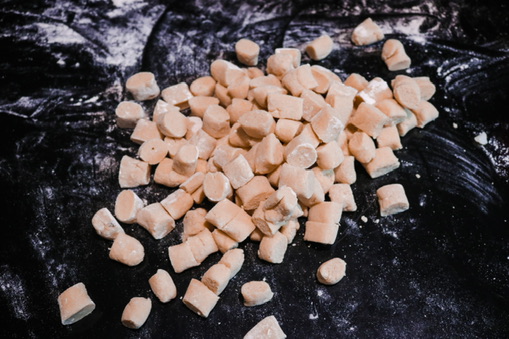
Remove a cup of the mashed potatoes and place into a medium bowl. Add in the flour + egg + salt and mix until the dough forms a ball. Divide the ball into 4 equal parts and on a floured surface, roll into long snakes. Cut the snakes into 1/2 inch pieces.
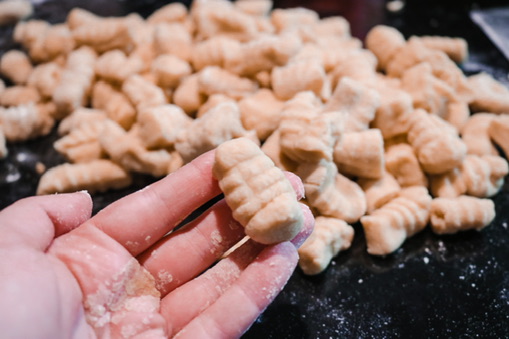
To add the grooves, place a fork upside-down and roll the gnocchi off the tines.
In a large pot of salted boiling water, place the gnocchi in. Let cook for about 5 minutes and until they float to the top. Drain the gnocchi and serve with your favorite pasta sauce!
This recipe proves that though a food might seem scary but in reality it is very scary. Take on that challenge for foods or recipes that seem intimidating. Add loads of cheese and you’ll go to bed with a full belly and a big smile.
Homemade pasta sauce sounds like a recipe that takes all day. Sometimes that’s the case, however there can be a quick fix! This 2 minute pasta sauce, inspired by Action Bronson’s recipe, has so much flavor and includes most of the ingredients you already have in your pantry.
Ingredients
Large can of San Marzano Tomatoes
4 Garlic Cloves, minced
Basil Leaves
Parsley
Oregano
Olive Oil
salt + pepper
Let’s Get Cooking
Okay so based off the ingredients list I’m positive as a home cook you have these items just laying around in your pantry. Now I didn’t have fresh herbs so I used dried and it worked out just fine but OBVI use FRESH if you have it.
Start by pouring olive oil in a large saucepan and frying up the minced garlic. Let the garlic fry but be careful not to burn it!
Then add in basil + parsley + oregano and stir.
Add in your can of San Marzano and stir. Once all combined lower the heat and simmer for about 2 minutes. Once the flavors marry, remove from heat, add your salt + pepper to taste and wow look at that you just made your own pasta sauce! Pat yourself on the back you did great!
Serve with your fav pasta & get some breadsticks in there & enjoy!
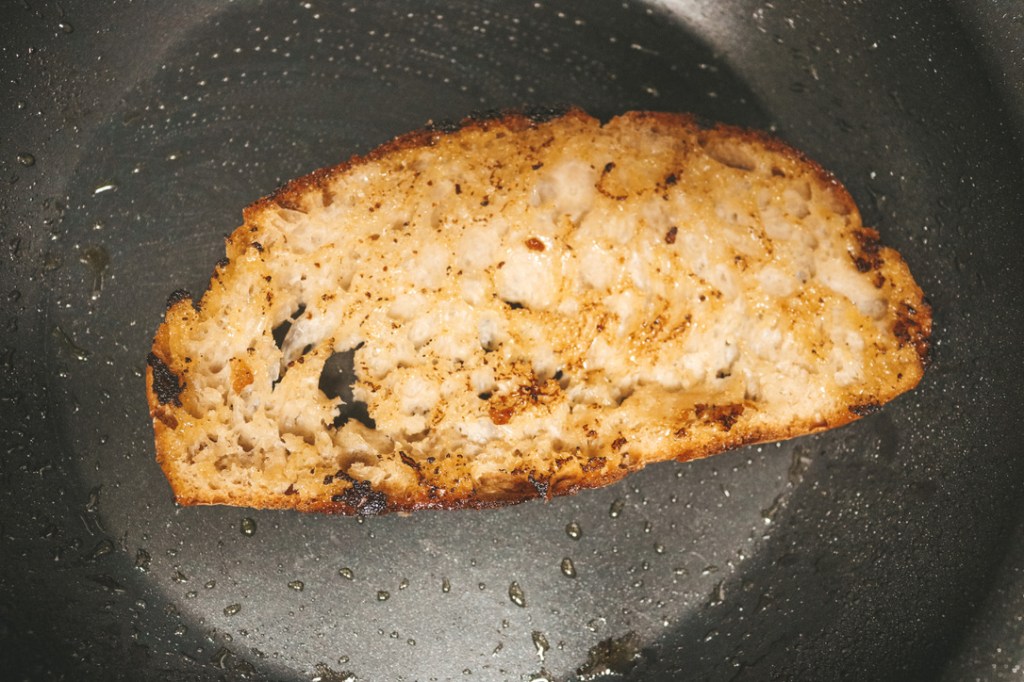
It’s the simplest ingredients that go the longest ways. I mean roasted garlic is good on a flip-flop. So with these 4 simple ingredients you are about to make a meal that will have your taste buds so damn happy. I got this recipe from Brad on It’s Alive by Bon Appetit. It should be noted that I love him very much but at the same time I need Bon Appetit to pay their POC employee’s fairly. This recipe uses homemade sourdough, but you don’t have to be like me and make sourdough solely for this recipe. Feel free to use a demi-baguette or whatever kind of bread your heart desires.
Ingredients
Sourdough Bread/Demi-Baguette, sliced
Ricotta Cheese
Olive oil
Cherry Tomatoes
Garlic Cloves
Salt + Pepper
Let’s Get Cooking
Bring out a large sauce pan and add in about 1-2 TBSP olive oil. Add in 6-8 cherry tomatoes [depending on how many people you are cooking for, use about 6 for one serving] and whole cloves of garlic, with the husks on, about 2-4.
Saute the tomatoes and garlic until the tomatoes begin to burst open and slightly char and the garlic has softened. Remove from heat, placing the garlic in the bowl first and tomatoes on top, top off with salt + a little olive oil.
Add in about 2 TSP more of olive oil into the same pan and place the sliced bread into the pan, allow to toast on both sides.
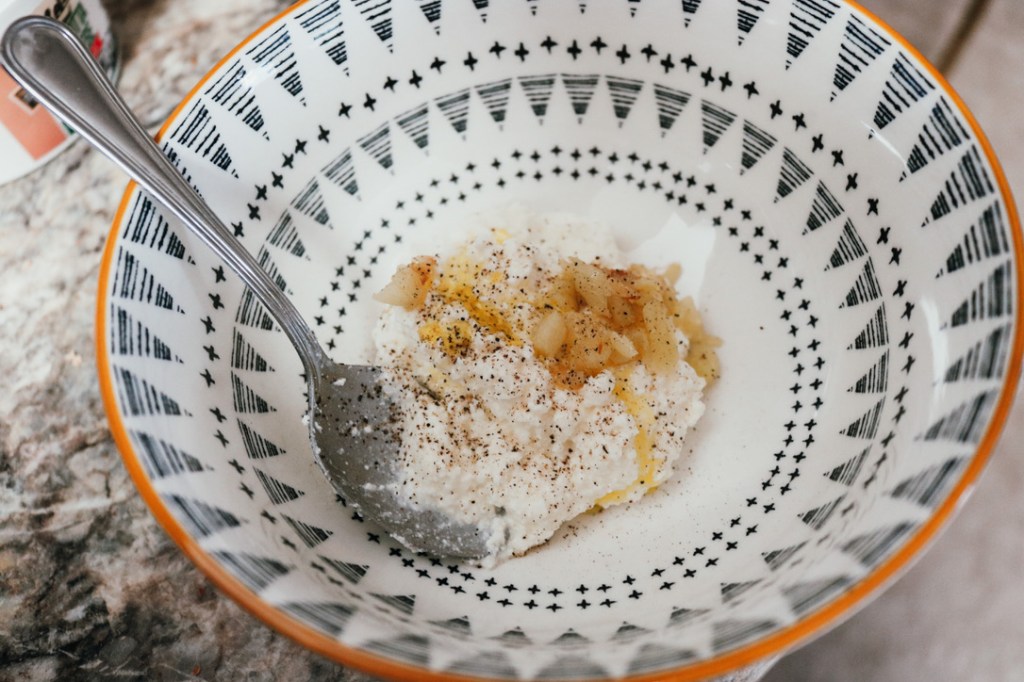
While the bread is toasting, place ricotta cheese in a bowl. Take the garlic from the tomatoes and remove the husks. Smash the garlic with a knife and rough chop them. Once chopped add to the ricotta. Add in olive oil + salt + pepper and mix well.
Once the bread is toasted to your preference, top off with the ricotta cheese, tomatoes, and any juices that is left off in the tomato bowl.
Theres something about sourdough bread and avocado that makes breakfast 100% times better. This is a super easy breakfast that will impress your whole family, or cat, I’m not judging! You obviously don’t need to make your own sourdough bread specifically for this recipe, but if you have some around the house UTILIZE IT!
Ingredients
Sourdough Bread, toasted/ or whatever bread you have
Avocado
Salt + Pepper
Lime Juice
Eggs
Butter
Let’s Get Cookin’
Another at home recipe that I did and obviously didn’t start writing it down until it was too late, but here we are anyway.
Cut your bread, or if your fancy and it’s already sliced, place in the toaster and toast to desired doneness.
Halve the avocado and place in a small bowl. Add in the salt + pepper + lime juice and mash until mixed well.
Place about 1 TBSP to 1/2 TBSP in a pan and heat to med-low. Whisk eggs in a bowl. Pour into pan and turn the heat down to low. Frequently push the eggs around the pan as they begin to fold. Cook until they are solid. Finish off with salt + pepper.
Take the toasted bread and spread the avocado mash over top, place the avocado over top or on the side whatever you prefer, I’m not going to tell you how to eat your eggs.
Another improvised recipe? You betcha it is! I had some frozen shrimp and hot dog buns in the freezer along with some beautiful lettuce from the garden and this is what we ended up with. A delicious classic. Of course I don’t have anything measured exactly, respect my creative space please.
Ingredients
3-4 Shrimp, fresh or frozen
Hot Dog Buns, toasted
Lettuce
Tomato, sliced
1/4 Cup Mayo
2 TBSP Sriracha
Cumin
Chili Powder
Corn Meal
Flour
Ingredients
Mix together enough flour+ corn meal+ salt + pepper+ chili powder + cumin to coat the shrimp.
In a large pan, heat up a thin layer of oil. Once the oil is hot, place in the coated shrimp. Cook about 2-3 min each side. The corn meal should crisp up and begin to brown. Once cooked, remove the shrimp and place on a paper towel.
While the shrimp is cooling down, mix together about 1/4 cup mayo with about 2 TBSP of sriracha.
Take the toasted bun, place lettuce, tomato, shrimp, and top off with the sriracha mayo.
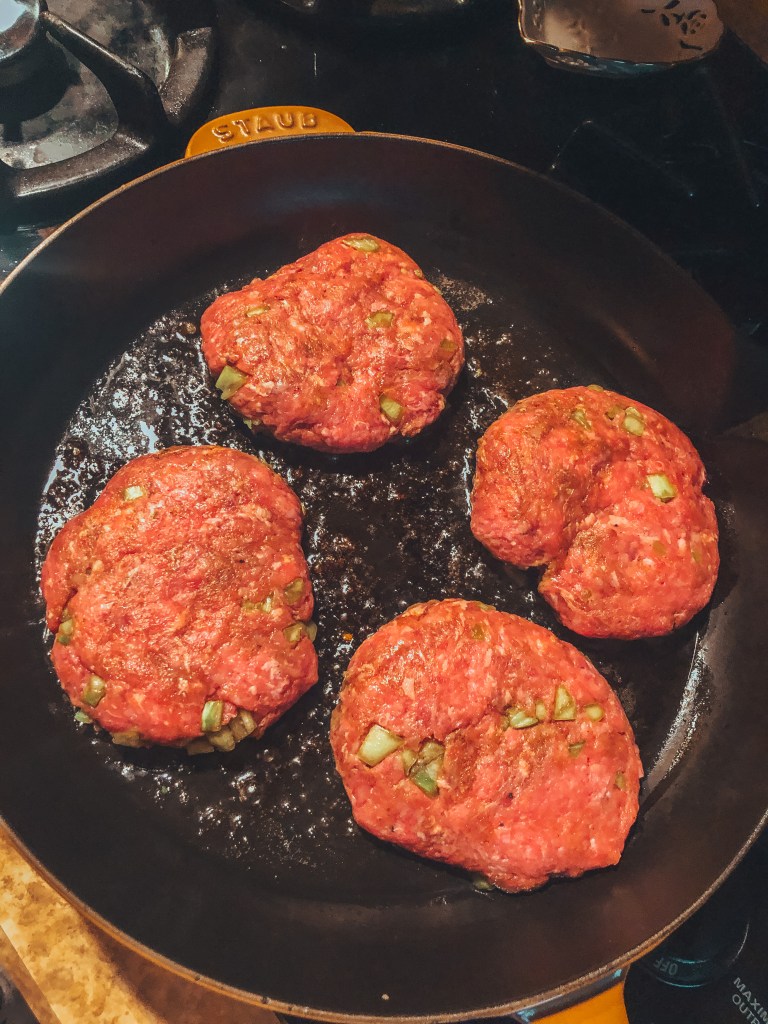
Another Bob’s Burger, Burger recipe?! Don’t act like you’re not excited! I used our hot peppers from the garden instead of jalapeños so feel free to use whatever pepper you’d like! This one is for the Cumin Lovers, if you don’t like Cumin, don’t bother.
Ingredients
3 TBSP Ground Cumin
1 LB Ground Beef
2 Jalapeño Peppers, seeded and diced
1/2 Cup Mayo
1 TBSP + 1 TSP Fresh Lime Juice
1/3 Cup Chopped Cilantro
1 Ripe Avocado
4 Buns
Arugula/or any lettuce
1 Large Tomato, sliced
Let’s Get Cooking
Add the cumin into the ground beef along with some salt + pepper. Mix in the diced jalapeños and form 4 patties. Cook the burgers to your desired doneness.
In a small bowl add in mayo + lime juice + cilantro. Mix well!
Halve the avocado and slice into thin slices, top with 1 TSP of lime juice.
Take your buns and add mayo on the top bun.
Time to build the burger: bottom bun, arugula/lettuce, tomato, burger, avocado, top bun.
Wham, Bam, Boom, what a quick and easy burger that gives you a little extra kick!
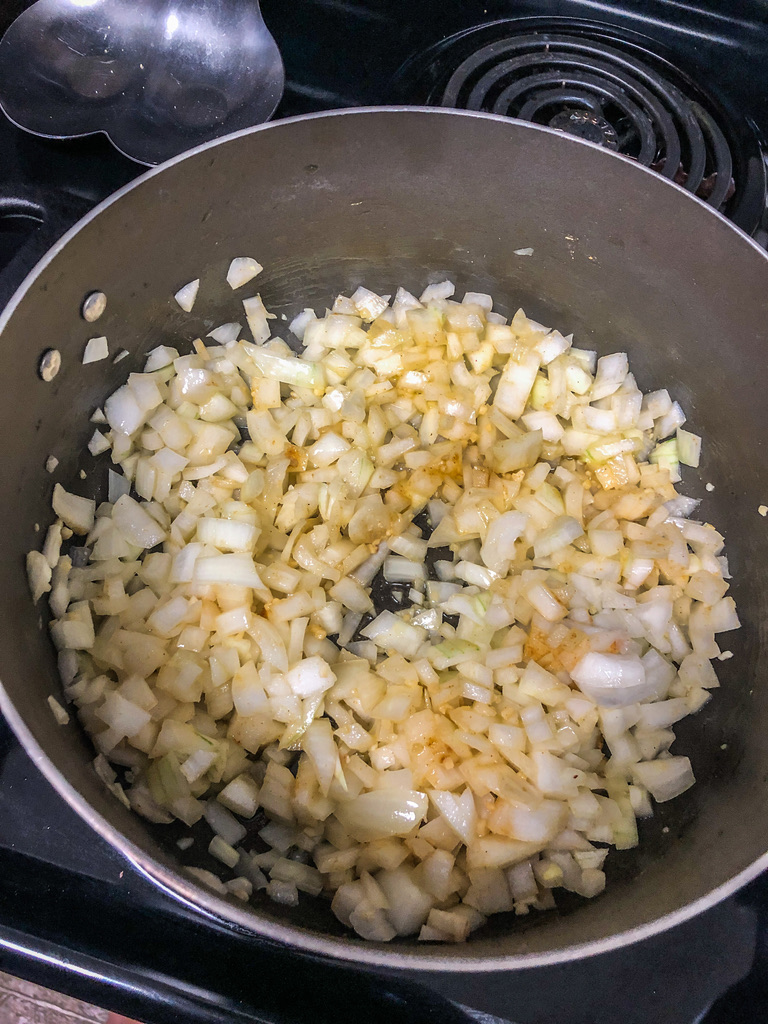
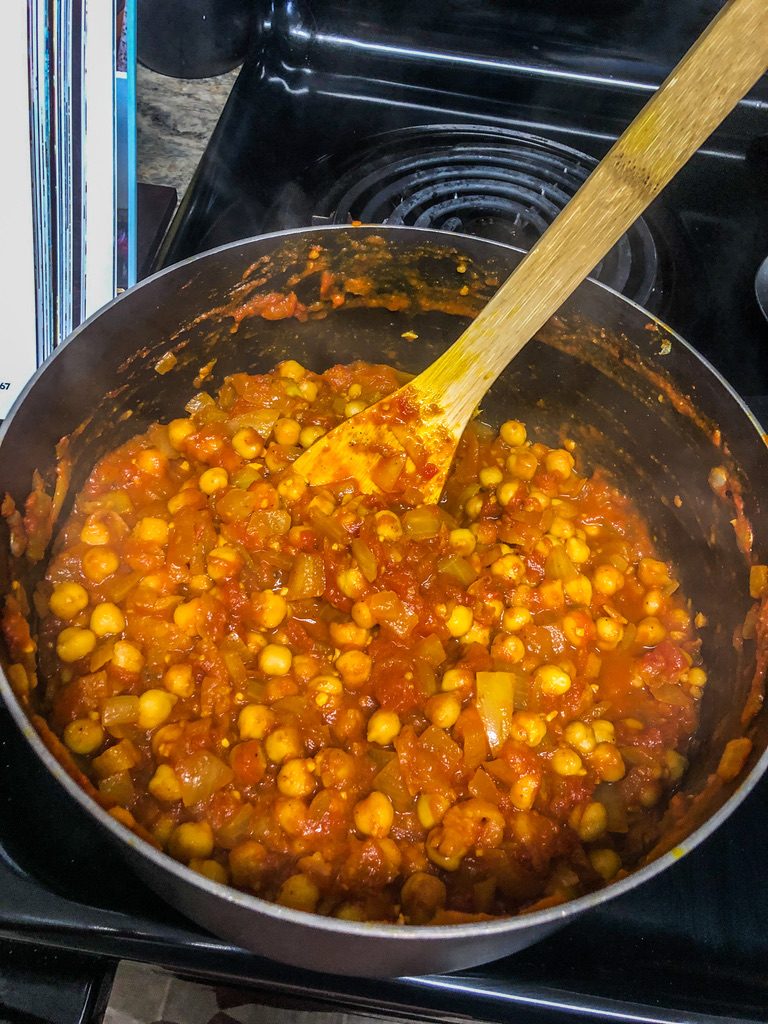
I LOVE Indian Cuisine; the spices, the flavors, it truly goes unmatched. The hard thing about Indian recipes is that at times, to get such these amazing spice profiles, they take quite a while to complete. This recipe, Antoni’s of course, has such amazing flavor in such a short time. Not only that, but if you are working to incorporate a meatless meal here and there, this is a great one!
Ingredients
2 TBSP Extra Virgin Olive oil
2 TBSP Unsalted Butter
2 Medium Onions, Finely chopped/ about 3 cups
4 Garlic Cloves, thinly sliced
2 TBSP Ginger, Finely chopped & peeled
1 1/2 TSP Ground Coriander
1 1/4 TSP Ground Cumin
1 1/2 TSP Ground Turmeric
1/8 TSP Cayenne Pepper
Kosher Salt
1 28 oz Can Whole Tomatoes
2 15 oz Can Chickpeas, rinsed and drained
1/3 Cup Dried Apricots, thinly sliced
1/2 Cup finely Chopped Fresh Cilantro
1/2 Cup finely Chopped Red Onion
Lime Wedges
Plain Yogurt
Basmati/Jasmine Rice
Let’s Get Cooking
Heat the EVOO and butter in a large pot over med-high heat until the butter is melted. Add in onions + garlic + ginger and cook, stirring until the onions have softened. Add in the remaining spices, coriander + cumin + turmeric + cayenne + 1 TSP Salt.
Add in the tomatoes with their juices, and 1/2 cup water. Using a wooden spoon, break up the tomatoes. Add in the chickpeas and use the spoon to mash up a quarter of them. Stir in the chopped apricots and increase heat to high. Once the mixture has come to a boil, reduce the heat to a simmer and stir occasionally. Let thicken for about 18-22 minutes. Once the time is up, taste and adjust for salt and remove from heat.
Serve the masala ASAP with some jasmine or basmati rice. Top with, if you’d like, some red onion and cilantro on top with lime wedges and a scoop of yogurt!