A Caesar salad with chicken and some french fries is a summer staple for me. That tangy Caesar dressing and those croutons are just so complimentary. Rather than croutons, grab some hamburger buns, and let’s turn this salad into a delicious burger. The best part is, with the leftover romaine and dressing you have, you can make your adored chicken Caesar salad with the leftovers! and yes, Caesar salad dressing is made with anchovies, so just get over it, you’ve been eating it this whole time anyways.
Ingredients
1 2oz Tin or Jar Anchovies packed in water
2 TSP Garlic, minced [I used 2 cloves]
1 TSP Dijon Mustard
1 TSP Worcestershire Sauce
1 Cup Mayo
1/2 Cup Parmesan Cheese, finely grated
3 TBSP Lemon Juice
1 TBSP Olive Oil
1 LB Ground Beef
4 Hamburger Buns
1 Head Romaine Lettuce, leaves chopped
Let’s Get Cooking
Grab your food processor and dump the tin of anchovies and the water in, blend into a paste.
In a small bowl, combine 3 TSP of the anchovy paste + garlic + mustard + Worchestershire + mayo + parmesan + lemon juice + olive oil. Set aside, I let mine sit for about 3 hours in the fridge, you don’t have to let yours sit that long!
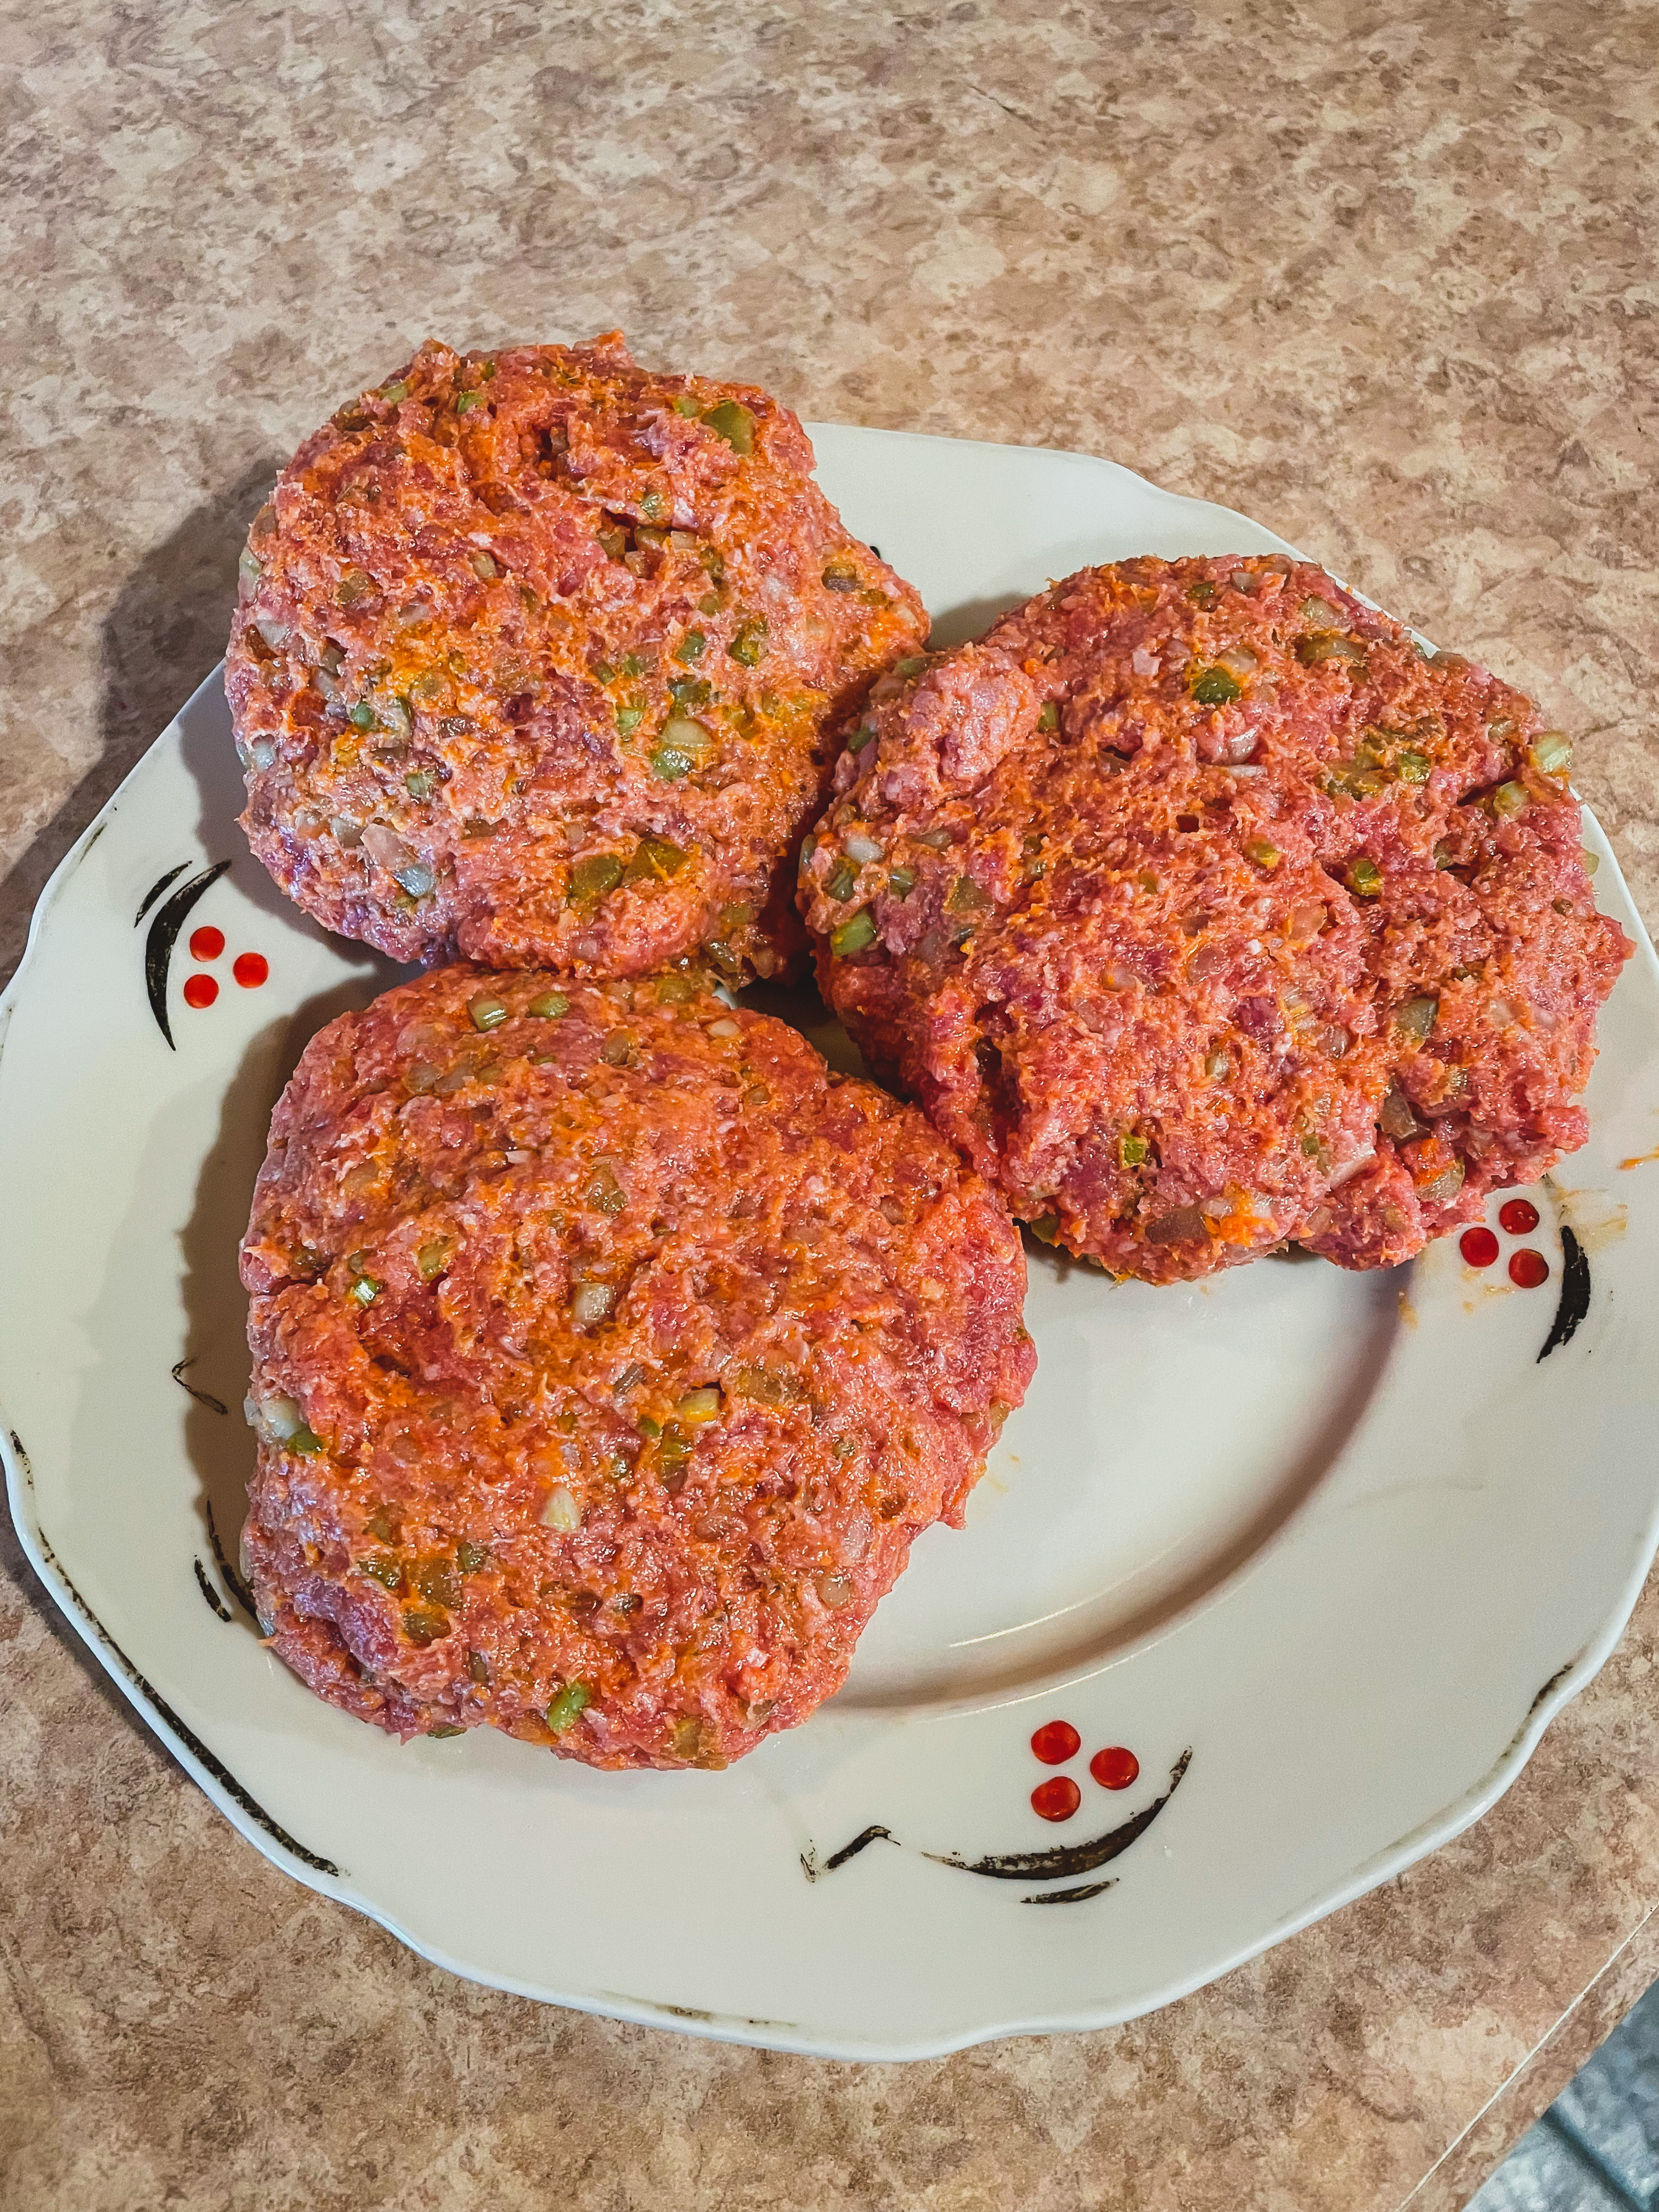
Mix the remainder of the anchovy paste in with the beef and form 4 patties. Season both sides with salt & pepper and cook the burgers according to your desired doneness.
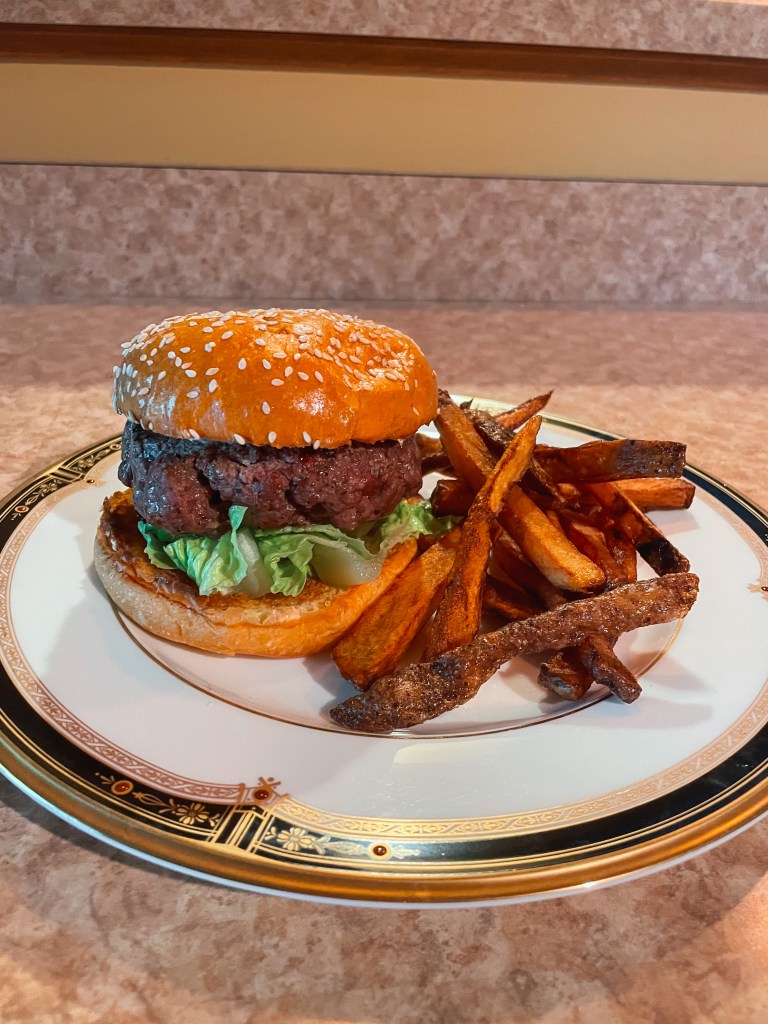
BUILD YOUR BURGER: Bottom bun, chopped romaine, burger, Caesar dressing, top bun.
Though it’s just me I have to get ready in the mornings, sometimes that can be more than enough. Anything that makes mornings easier, I am about, and this breakfast casserole from ChewoutLoud is one of them. First off it’s so easy to prepare, and secondly, I feel like I am getting all my necessary nutrients in the morning, which is always a win. What I also love about these casseroles is you get to tweak them based on what you have in the kitchen; don’t have kale? Use spinach! Don’t have peppers? Cool, don’t use them! Make it your own! I added some extra spices to my sweet potatoes because I feel at times they can be bland.
Ingredients
4 TSBP Olive Oil
1 LB Sweet Potatoes, peeled and cut into bite-sized cubes
2 TSP Turmeric
2 TSP Chili Powder
1/2 Cup Yellow Onion, diced
4 Garlic Cloves, minced
1/2 Cup Bell Peppers, diced
1 LB Ground Breakfast Sausage
2 Cups Kale, chopped
14 Large Eggs
1/2 Cup Milk
Salt & Pepper
Let’s Get Cooking
Preheat the oven to 400F
On a baking sheet, combine sweet potatoes + 2 TBSP olive oil + turmeric + chili powder + salt + pepper & toss to coat. Bake for about 20 minutes or until soft.
While the sweet potatoes are cooking heat the remaining 2 TBSP of oil and add in the onions + garlic and cook until translucent on MED heat. Add in the peppers & cook for about 1 minute more. Transfer the mixture to a large baking dish.
In the same skillet, cook the breakfast sausage until cooked through. Drain and add to the baking dish. Add in the roasted sweet potatoes + kale, toss to combine.
In a bowl, whisk together the eggs + milk + salt + pepper. Pour into the baking dish and bake uncovered for about 25-30 minutes or until the eggs are set.
Serve immediately, or cut once cooled and wrap in foil and freeze!
I ADORE Halfbaked Harvest. She makes the best recipes, that at first glance seem complicated, but when you get down to it, they are easy & so freaking delicious. I made these gyros over the last week, and being one person, I had them for dinner multiple nights in a row. Usually, I get bored with eating the same thing over and over again, but I was excited for dinner every night! Tiegan uses feta in her tzatziki, I did not have any & it turned out delicious, but feel free to add it if you like! Don’t forget to set some time aside so the chicken can marinate! For serving, I added lettuce, homemade pickled red onion, and dill.
Ingredients
1/3 Cup Plain Yogurt [She calls for full fat, but I used low-fat and it worked perfectly]
1/4 Cup Olive Oil
1 1/2 LBS Boneless, Skinless, Chicken Thighs, or Breasts, cubed
1/4 Cup Lemon Juice
6 Garlic Cloves, chopped
2 Shallots, chopped
1 TBSP Smoked Paprika
1 TBSP Oregano
1 TSP Turmeric
Red Pepper Flakes
Salt & Pepper
Pitas or Naan, warmed
Tzatziki
8 oz Feta Cheese
1/4 + 1/3 Cup Greek Yogurt
2 Garlic Cloves, grated
Juice from 1 Lemon
1/2 Large Cucumber, shredded
salt
Let’s Get Cooking
In a bowl, combine yogurt + olive oil + cubed chicken + lemon juice + garlic + shallots + paprika + turmeric + oregano + chili flakes + salt + pepper. Mix well to combine and let marinate for at least 15 min at room temp or overnight in the fridge.
Preheat the oven to 425F.
Arrange the chicken on a baking sheet and bake for 15 minutes. Toss and bake for another 5-10 minutes/ until cooked through. Switch the oven to broil and cook until the chicken chars on the edges, about 1-2 min WATCH CAREFULLY.
Make the tzatziki while the chicken cooks. Combine feta + 1/4 cup yogurt + garlic + lemon juice in a blender and blend until creamy. Stir in the 1/3 cup yogurt + cucumber + pinch of salt + red pepper flakes. Always taste test to be sure.
To assemble: spread the warm naan with tzatziki, then lettuce, and chicken [ I like to sprinkle some dill on top]. Add on red onions & a little cilantro.
There are some things that America gets right, like BBQ, Chicken Wings, & Burgers. Now just combine the best of those things, a homemade buffalo sauce + a DELICIOUS blue cheese sauce & don’t forget the celery, to get this amazing burger that will WOW you. [You also get tons of extra buffalo sauce that you can use to make air fryer chicken wings.] All I have to say is Bob [Bob’s Burgers] knew what he was doing with this one.
Ingredients
2/3 Cup Frank’s Red Hot sauce
1 Stick + 1 TBSP Butter, divided
2 TBSP White Vinegar
1/4 to 1 TSP Cayenne [ I like it hot so I do 1 TSP]
1/2 White Onion, finely chopped
2 TBSP All Purpose Flour
1 Cup Whole Milk
1 Cup Crumbled Blue Cheese
3 Stalks Celery, finely chopped
1 LB Ground Beef
4 Sesame Buns
Green Leaf Lettuce
Let’s Get Cooking
Make the Buffalo Sauce
Combine the Frank’s Red Hot + butter + vinegar + cayenne in a small saucepan & stir over MED heat until the butter is completely melted. Remove from heat and let stand until cool.
Make the Blue Cheese Sauce
Melt the remaining TBSP of butter in a saucepan over MED heat. Add the onion and cook until softened. Add in the flour & stir vigorously. Slowly add the milk, stirring constantly. Add in the blue cheese and mix until it melts completely. Allow the sauce to sit on low, often stirring until it thickens up and coats the back of a spoon.
Make the Burger
Mix the celery and 1/2 cup of the buffalo sauce into the beef and gently form into 4 patties. Season both sides with salt & pepper. Cook as you normally would, I do about 6 min each side on MED heat. Be extra careful when you flip, this burger is a little softer due to the buffalo sauce.
Build your Burger
Start with your bottom bun [I like mine toasted] + lettuce + burger + blue cheese sauce + buffao sauce + top bun.
Serve with french fries and extra napkins, but the mess is always worth it.
I grew up having a contest with my brother to see who could eat the most Sour War Heads in one sitting. The roof of my mouth was always destroyed and it was worth it every time. It is safe to say that I love all things sour and anything that highlights citrus flavors. I found this recipe from our girl Claire Saffitz in her Dessert Person cookbook and I was intrigued; not many desserts highlight limes, so I had to give it a try. These bars are so refreshing & also TART, these are the perfect dessert for a person like me who loves a good lip pucker, if you are like me, I HIGHLY recommend them. You need an 8×8-inch pan for this recipe.
Ingredients
Shortbread Crust
Butter for the pan
2 TBSP finely grated Lime Zest, takes about 3 limes
1/4 Cup Granulated Sugar
1 Cup All Purpose Flour
2 TBSP Finely Chopped Fresh Mint
1/4 TSP Baking Powder
1 Stick Unsalted Butter, cut into 1/2-in pieces, chilled
Salt
Lime Curd Filling
3/4 Cup Fresh Lime Juice, about 7 limes
1/4 Cup Fresh Lemon Juice, about 1 Large Lemon
1 TSP Cornstarch
1 Cup Sugar, divided into 1/2 cups
5 Large Egg Yolks
1 Large Egg
6 TBSP Unsalted Butter, cut into tablespoons, chilled
Salt
Powdered Sugar & Lime Zest for serving
Let’s Get Baking
Place the oven rack in the center of the oven and preheat the oven to 350F. Line the baking pan with two sheets of foil, crossing one over the other. Butter the bottom of the sides of the foil and set the pan aside.
Onto the shortbread crust: In a medium bowl, use your fingertips to massage the lime zest into the granulated sugar until fragrant oils are released and the mixture looks like wet sand. Add in the flour + chopped mint + baking powder + salt and toss to combine. Add in the pieces of chilled butter and toss to coat in the flour mixture. Use your fingers to smash the butter completely into the flour mixture, working until you have lots of moist crumbs that hold together easily when squeezed.
Transfer the shortbread dough onto the prepared pan and scatter the crumbs easily across the bottom. Use your hands to flatten the crumbs into an even layer across the bottom. Bake the shortbread until lightly golden across the surface, about 25-30 minutes. Remove the pan from the oven. Reduce the oven temp to 300F. Let the crust cool while making the filling.
To make the lime curd filling: In a small saucepan, combine lime juice + lemon juice + cornstarch + salt and 1/2 cup of the granulated sugar and cook over MED heat, whisking occasionally to dissolve the sugar. When the mixture comes to a boil, whisk constantly until it thickens slightly from the cornstarch, about 1 minute. Remove the saucepan from the heat.
In a medium bowl, vigorously whisk the egg yolks + whole egg + remaining 1/2 cup until the mixture is smooth, thick, and has paled in color a couple shades, about 1 minute. Whisking constantly, slowly drizzle the hot citrus mixture into the eggs a TBSP at a time to slowly raise the temperature, until you’ve added about half the citrus mixture to the eggs.
Whisk the egg mixture back into the saucepan, then set back over MED-LOW heat and cook, whisking constantly, until the curd turns opaque is thick enough to coat the back of a spoon, and barely holds the marks of the whisk, about 3-5 minutes. Remove the curd from the heat and whisk in the butter a piece at a time, waiting until each piece melts before adding the next until the mixture is smooth.
Pour the hot curd over the crust and shake the pan gently so it settles in an even layer. Bake the bars until the sides have puffed & the center is set but still a bit wobbly when you shake it, about 30-35 minutes. Remove from the oven & let the bars cool completely in the pan.
Transfer the cooled pan to the fridge and chill until the bottom of the pan is cold to the touch, about 1 hour. Remove the foil & cut it into about 16 squares. Dust with powdered sugar and top with more lime zest before serving.
Hi, it’s been a minute. I’ve had to take the time to focus on studying for the National Counselor Exam (NCE) and I unfortunately, had to step away from the blog for a little but I am back! I am so excited to be back into my hobbies and doing the things I love. I found this recipe from the New York Times Cooking website; it caught my eye because of the soup being topped with sour cream & onion chips. The recipe calls for the soup to be made in a slow cooker, but I made it in a stock pot and it came out AMAZING. I top mine with extra cracked black pepper, cheese, & of course potato chips. This soup has such a different taste and it’s so creamy, it’s an automatic new favorite.
Ingredients:
2 TBSP Olive Oil
1 LB Yukon Gold Potatoes, scrubbed, peeled, and cut into 1in chunks
1 LB Cauliflower, chopped into large bite-sized florets and stems
2 15oz Cans Cannellini beans, drained
1/2 Yellow Onion, minced
6 Cloves Garlic, smashed & minced
3 1/2 Cups Vegetable Stock
3 TBSP Unsalted Butter
2 TBSP Dry White Wine
1/2 TSP Dried Thyme
1/2 TSP Garlic Powder
1 TSP Lemon Juice
1 Cup Plain Greek Yogurt [ recipe calls for sour cream but I like the tang of the yogurt ]
Salt & Pepper
Sour cream & onion potato chips, for topping
Shredded cheddar, for topping
Let’s Get Cooking
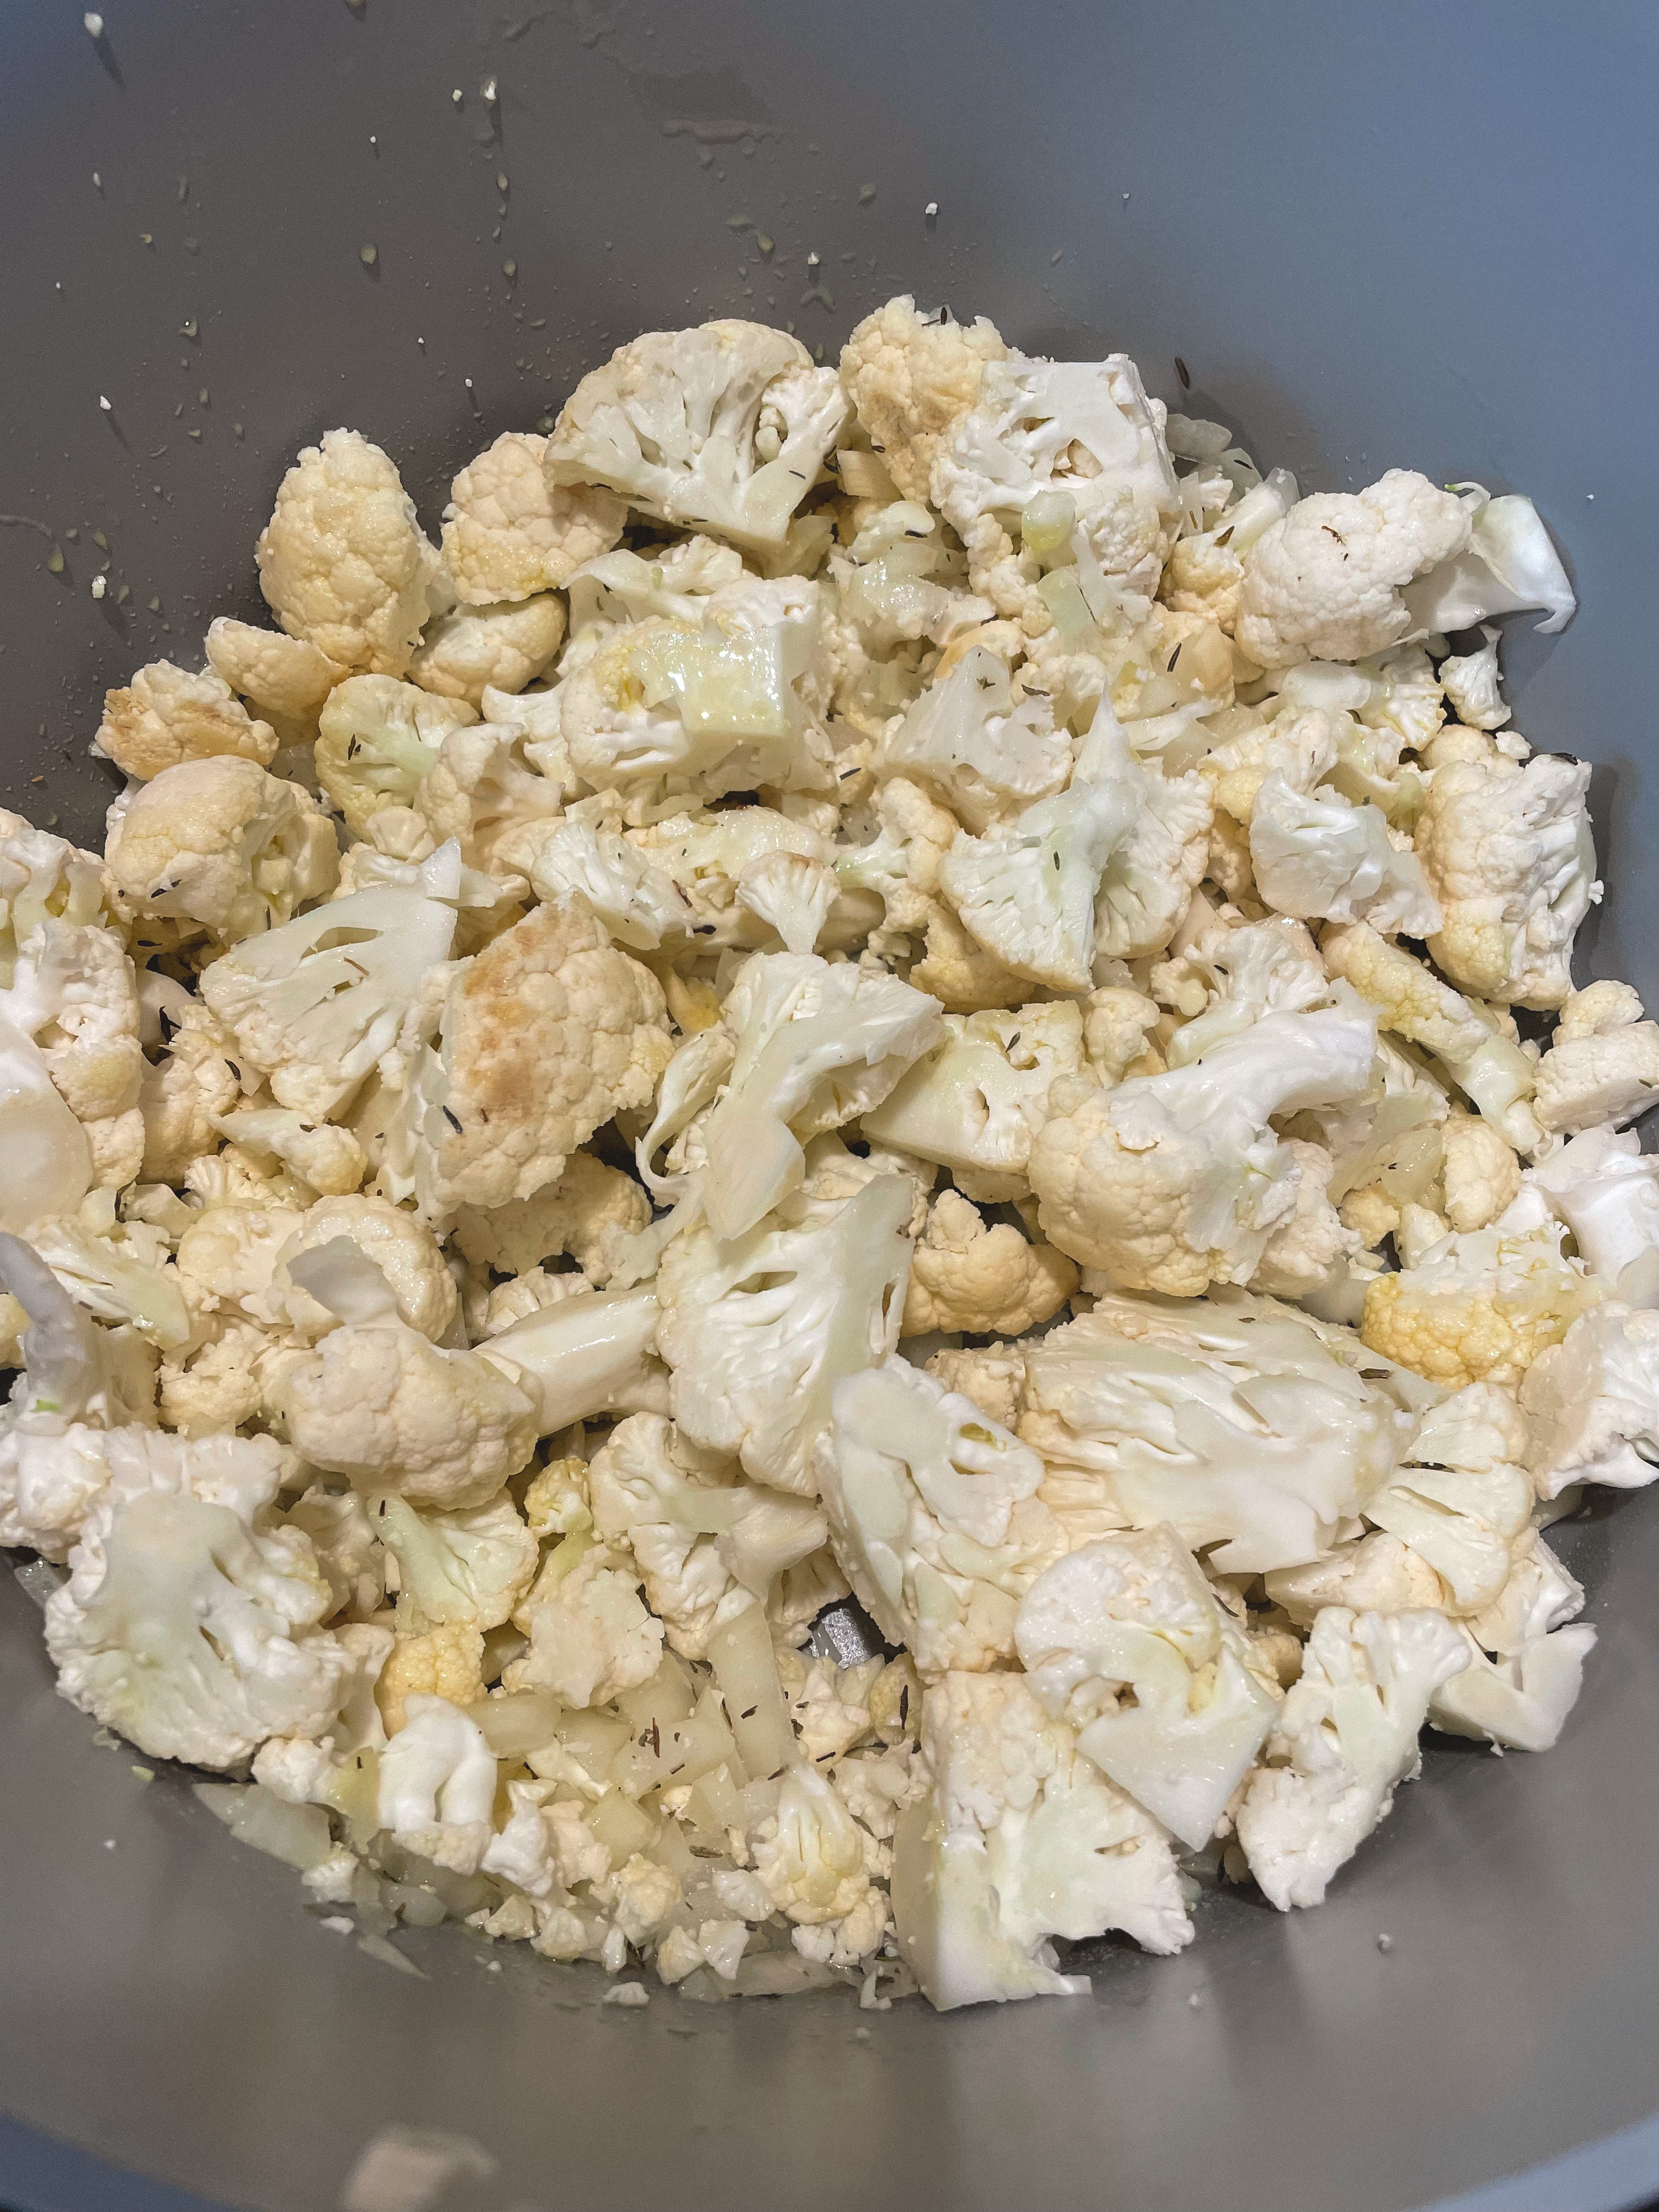
Prep all your ingredients beforehand, chopping the onion, potatoes, cauliflower, and garlic.
In a large stock pot, heat the olive oil and add in the garlic + onion and let saute for about 2-4 min. Once fragrant, add in the potatoes + cauliflower. Let the vegetables cook for about 8 minutes on MED heat.
Add in the beans + vegetable stock + butter + thyme + garlic powder + dry white wine + salt + pepper and stir to combine. Bring the soup to a boil and allow to simmer for about 1 hour or until all the vegetables are soft. Using a potato masher, mash the vegetables until the soup has a chunky texture, allow to cook for another 30 minutes.
Using a blender, blend the soup [ in batches if you need to ] and return to the pot. Stir in the lemon juice + greek yogurt/sour cream. Top with more black pepper.
I am never never NEVER one to support recipe trends where people say, “WOW THESE ZUCCHINI CHIPS TASTE JUST LIKE POTATO CHIPS”. No, they don’t, and they never will. Stop lying to yourself and just eat a potato chip. But anyways, I have seen around the inter-webs people creating mini-desserts with dates, so I decided to make my own little creation. I am not going to agree with those people that these dates taste just like Snickers, because they don’t, but they are damn good. They are the perfect bite for when you want a little something sweet after dinner.
Ingredients
Peanut Butter
Dates, pitted and split on the side
1/2 Cup Chocolate chips
1/3 Cup Half & Half, or Milk, use what you have and use more if needed
Chopped Almonds or Walnuts
Flaky Sea Salt
Let’s Get Cooking
If your dates aren’t pitted, be sure to do that now. Prep a baking sheet with a piece of parchment paper. Cut a slit on one side of all the dates.
Using a spoon, place a small amount of peanut butter into the date, making sure it is enough that the date can still slightly close. Once all the dates are stuffed, melt the chocolate + half and half in a microwave-safe bowl at 30-second increments until combined. Coat the stuffed dates into the chocolate, it’s going to be messy, but it’s okay.
Place onto the parchment paper, and top with the chopped walnuts/almonds and sea salt.
Another day another soup. Perfect for a cozy winter weeknight, this Minestrone from the Barefoot Contessa takes advantage of all the winter veggies, making you feel as though you are getting your daily intake. Ina recommends that you serve the soup with garlic bread and extra parm.
Ingredients
Olive Oil
4 oz Pancetta, 1/2 in diced, [I also used bacon]
1 1/2 Cup Chopped Yellow Onions
2 Cups 1/2 in Diced Carrots, 3 carrots
2 Cups 1/2in Diced Celery, 3 Stalks
2 1/2 Cups Butternut Squash, diced and peeled
1 1/2 TBSP Mince Garlic, 4 cloves
2 TSP Chopped Fresh Thyme
26 oz Canned/Boxed Chopped Tomatoes
6-8 Cups Chicken Stock
1 Bay Leaf
Salt + Pepper
1 15oz can Cannellini Beans, drained and rinsed
2 Cups Cooked Small Pasta
8-10oz Fresh Baby Spinach
1/2 Cup Dry White Wine
2 TBSP Pesto
Let’s Get Cookin
Heat 2 TBSP olive oil over MED heat in a large dutch oven.
Add in the pancetta and cook over MED-LOW heat, for about 6-8 minutes, stirring occasionally. Add in the onions + carrots + celery + squash + garlic + thyme and cook over MED heat, cooking until the vegetables begin to soften.
Add in the tomatoes + chicken stock + bay leaf + 1 TBSP Salt + 1-1/2 TSP Pepper. Bring to a boil and then lower the heat and simmer, uncovered for 30 minutes.
Remove the bay leaf and add in the beans + cooked pasta and stir well to combine.
Add in the spinach + white wine + pesto. Take a taste test and add more salt if needed.
Serve with extra parm cheese & a drizzle of olive oil.
This spicy tuna tip is perfect for a holiday appetizer. The tuna is from Wild planet foods which you can find at Walmart, the tuna is caught sustainably and the product is quality! Check out the reel from my Instagram, @ahangryhannah for the how-to on an already simple recipe! Serve with crackers or chips.
Ingredients
1 Clove of Garlic, minced
1 Package of Cream Cheese, room temp.
1 Can Wild planet foods Albacore Tuna, no need to drain!
1/4 Cup Sour Cream
3 TBSP Old Bay
Juice of 1 Lemon
Salt + Pepper
Squeeze of Sriracha
Parsley to Garnish
Let’s Get Cookin’
Combine the cream cheese + tuna + sour cream + old bay and mix well.
Squeeze in the lemon, add in the salt + pepper + sriracha, and mix well again making sure there are no clumps from the cream cheese.
Feel free to add in a little extra old bay and sriracha as needed.
Next to cheese fries and a few other amazing things, fried chicken is up there in my top 5 favorite foods. There is nothing better than that perfect crispy breading, and juicy meat, and you can’t forget all the delicious sides that go along. I found this Hot Honey at ALDI and I knew I had to have it with some fried chicken. I learned a life-changing trick from Meg’s Everyday Indulgence that makes sure the breading stays on the chicken while frying. I make this after pickle brining the chicken for 24 hours. You can always omit that or marinade with buttermilk. Serve this fried chicken up with your favorite sides, like mac & cheese, french fries, or a side salad.
Ingredients
16 oz Pickle juice
1 Cup Water
2 Smashed Garlic for Brine
1 LB Chicken cut of choice, I used drumsticks, can use thighs or breast
3 Large Eggs
1/3 Cup Water
1 Cup Hot Sauce
4 Cups All-Purpose Flour
1 TSP Salt
2 TSP Pepper
2 TSP Paprika
1 TSBP Cayenne Pepper
Berryhill Hot Honey [can buy at ALDI]
Peanut or Vegetable Oil for fryer
Let’s Get Cooking
In a large bowl, place the pickle juice + garlic + 1 cup of water and add in the chicken. Cover with foil and place in the fridge to rest for 24 hours. Drain chicken from brine and pat dry when ready to use.
In a bowl, whisk together the eggs + water + hot sauce and set aside.
On a large plate, whisk together flour + salt + pepper + paprika + cayenne.
Dredge the chicken in the flour, then egg wash, then flour again and place the chicken on the wire rack or baking pan and let rest in the fridge for 30 minutes. Meg ensures that this allows the breading to stick to the chicken and she is absolutely right!
Heat the frying oil to 350F and work in batches frying the chicken for about 15-18 minutes or until cooked through.