Breakfast sandwich is a staple, especially when hungover. You can also make it however you want, bacon, sausage, eggs, cheese, hash browns, the options are endless. I use croissants that I made, but you can use store bought too, fresh or frozen, it doesn’t matter! As long as you make it with love, and some good ass bacon, you can never go wrong.
Grab two slices of bacon and cut in half, place in a hot pan and cook to your liking, I like mine a bit chewy but I know that is not for everyone.
If your croissant is frozen, be sure to thaw the night before. Or you can always cut it in half and throw it in the oven at 375F until warm.
Once the bacon is done, remove and place on a paper towel. Keep the heat on high, we are going to cook the egg FAST. Scramble one egg in a bowl and pour into the hot pan. Let the sides get a little cooked and move it around lightly with a wooden spatula until fully cooked. Place the eggs on a plate.
If you haven’t already, cut your croissant in half. Lower the heat and place the croissant cut sides down in the same pan you cooked the bacon and eggs in. This lets the croissant to soak up some of that yummy bacon fat. Keep in the pan until toasted.
To assemble: Place bottom croissant, bacon, egg, cheese, and top croissant.
Make before a trip and wrap in foil to throw in the oven morning of.
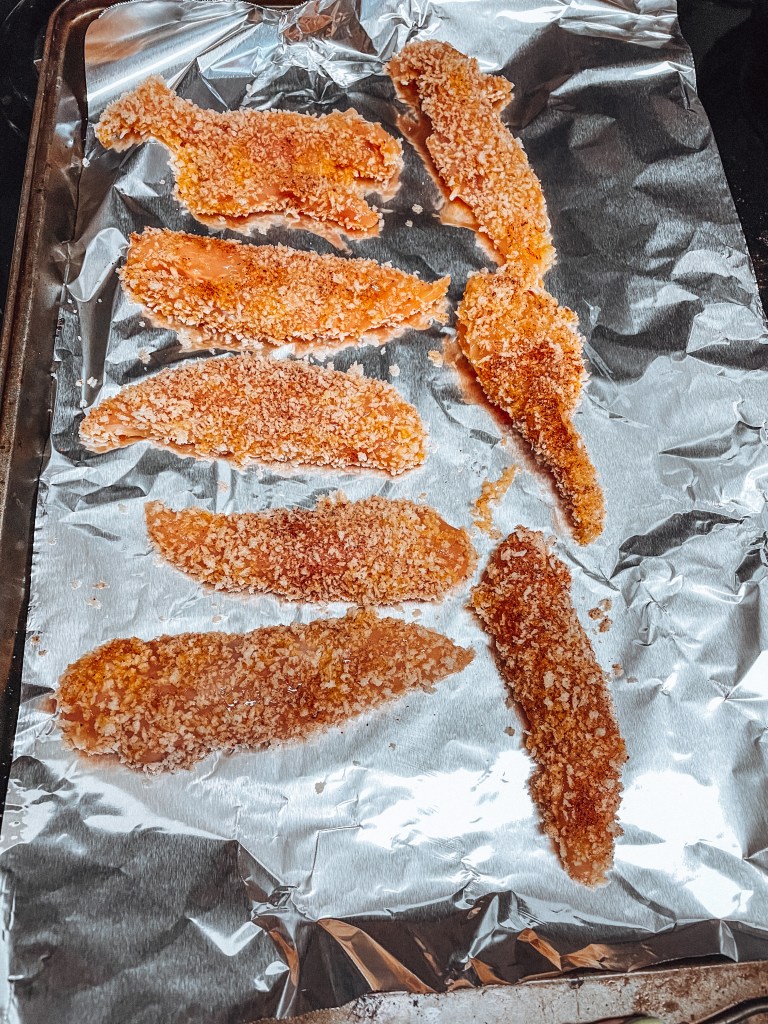
Chicken tenders are a childhood classic, they are like that baby blanket we still sleep with because we just can’t seem to let them go. Though you can buy them pre-frozen in the store [no shame] you can make them just as easy at home, with a little extra clean up. I prefer panko breadcrumbs for these, it adds to the texture and gives you that crunch.
Ingredients
1 Cup Panko Bread Crumbs
1 TSP Chili Powder
1/2 TSP Garlic Powder
Chicken Tenders
2 Eggs
Salt + Pepper
Let’s Get Cooking
Preheat the oven to 375F. Combine the panko + chili powder + garlic powder + salt + pepper.
Crack the egg in the bowl to make an egg wash.
Dip the chicken in the egg wash, then coat in the panko bread crumbs. Line on a baking sheet.
Cook in the oven for about 20-25 minutes.
Enjoy warm and with whatever condiments you love most.
No one wants a lame salad at work. I am not one who enjoys getting like a rabbit, but I understand some people like it. Anyway, lets spice up this salad with some steak and pretty much whichever toppings you enjoy. Idea and recipe for the Balsamic dressing comes from Longbourn Farm.
Ingredients
Salad greens of your choosing
Steak, I used 2 smaller cuts I found at the store
Cherry Tomatoes, sliced
Cucumbers, quartered
Red onion, sliced into ribbons
Green Onions
Goat Cheese [or cheese of your choosing]
Salt + Pepper
For Dressing:
1/2 Cup Olive Oil
1/4 Balsamic Vinegar
1 TSP minced garlic
2 TSP Honey
1 TSP Dijon Mustard
1/2 TSP Salt
1/4b TSP Pepper
Let’s Get Cooking
Heat a skillet on the stove to MED-HIGH heat. Cook the steak to your liking, I prefer med-rare so I went about 4 min per side. Remove steak from heat and LET IT REST! That part is important, this allows the juices to reabsorb and not get lost in the process of immediately cutting it.
Prep the rest of your ingredients and throw into a large bowl.
Combine the dressing ingredients in a closed container and shake to mix.
Cut the steak into strips once cooled and add to the salad. Place in your separate containers for lunches and keep the dressing on the side, or dress and serve immediately.
I think some of the best recipes come from scavenging in your fridge. I needed some lunches for the week but did not feel like going grocery shopping. I had a lot of different individual items so figured why not throw it into a pasta salad; that always ends up turning out well. Here is my little creation, I don’t know how greek it really is, but that’s the name I came up with.
Ingredients
1/2 Cup Cherry/Grape Tomatos, quartered
2 Cups Spinach
1/2 Cup Olives, halved, Kalamata or Green
2 Cups Cooked Rotini
1/4 Cup Olive Oil
1/4 Cup Feta Cheese
Salt + Pepper
Let’s Get Cooking
Cook the noodles per package instruction, make sure you cook it al dente.
Prep the rest of your ingredients.
Grab a large bowl and place spinach on the bottom, then pour the cook pasta over top, add in the olives + tomatoes + feta cheese + olive oil and toss. This allows the spinach to slightly cook due to the warm pasta.
Season with salt + pepper and enjoy!
Have for your weekly lunches or for a quick pasta side dish.
I planted a small herb garden on my patio, my very small patio. One of the herbs, dill began to completely take over, in a good way. I decided that I needed to use some to clear up some space and let its herb neighbors grow. I had some potatoes in the pantry and found this recipe from the Kitchn which is a Ukrainian Dill Potato recipe. I edited the recipe a bit, I prefer a crunchy potato with the grassy dill. This is a perfect summer side.
Ingredients
1-2 Large Potatoes, cut into cubes
2 TSP Duck Fat [optional]
1 TBSP Olive Oil
1/2 Cup Chopped Dill
Salt
Let’s Get Cooking
After cutting the potatoes into cubes, boil in salted water until a fork can pierce them easily, but does not fall off.
Preheat the oven to 420F. Place the par-boiled potatoes on a baking sheet and toss with the duck fat. Roast in the oven for about 25-30 minutes.
Once the potatoes are done, place in a bowl and toss with the olive oil, salt, and chopped dill.
I do not know a lot about making Ramen, I know it’s delicious and I know that there is a wonderful culture surrounding it, but I have never made it myself before. A co-worker of mine provided me with the cookbook, “Lets Make Ramen” which is this brilliantly designed comic cookbook detailing the culture surrounding ramen as well as easy to follow recipes. If I am to try a new recipe, I want to go all in, that means making my own broth and preparing all the accoutrements. I did not make my own ramen noodles [I will try that next time], but this follows the Lets Make Ramen chicken broth recipe!
Ingredients
Chicken Broth
5 LBS Chicken Bones/Caracases, including skin
1 LB Chicken Feet [if available]
1 Bunch Green Onions, trimmed and cut length wise
2 Apples, honey crisp, gala, fuji, quartered
1/2 LB Fresh Ginger, unpeeled, sliced 1/4 in thick
1 Bulb of Garlic, cloves smashed + peeled
1 TBSP Salt
Toppings
Boiled Eggs
Crispy Chicken Skins
Nori
Ramen Noodles [package works fine]
Let’s Get Cooking
Prep all of the broth ingredients and place in a large pot and cover with 6 quarts of cold water [that’s 24 cups]. Bring to a simmer over med-high heat then lower to maintain a slow simmer.
Cook the broth for about 4-5 hours, skimming off any of the scum that goes to the surface. Be sure to stir every hour or so.
The stock will reduce, after the 4 hour cooking time. Remove from heat and let cool to room temp.
Strain and discard all the other ingredients, store the stock in a tightly sealed container overnight.
There will be some fat on top once you are ready to use it, which is good. Melt in a small pot whenever you’re ready to use.
Preparing Toppings
When you’re ready to eat prepare you’re toppings before hand so everything is warm and ready.
To soft boil eggs: begin boiling the water, once boiling, place in the egg and boil for 8 minutes. Run under cool water and let the egg cool down. Peel then cut in half and add to your ramen.
Crispy Chicken Skins: Preheat the oven to 400F. Remove the skin off of chicken thighs. Line a baking sheet with parchment paper and place the chicken skins on top. Season with Salt + Pepper. Place another sheet of parchment on top with another baking sheet on top so they do not curl up. Cook for about 35 min.
Ramen: Boil the ramen according to the package, or until they begin to break apart/get soft, which takes about 4 minutes.
Once your both is hot and so are your toppings it’s time to move fast. Pour your broth in a bowl, followed by noodles, egg, crispy skins, and nori.
A picnic classic that just about everyone has their own version of. It’s the perfect meal to pair with warm weather and a crisp white wine. Make this as a bunch, or single serving, and serve on your choice of bread. I like croissants, but that’s just me.
Ingredients
1 Granny Smith Apple, diced into bite-sized pieces
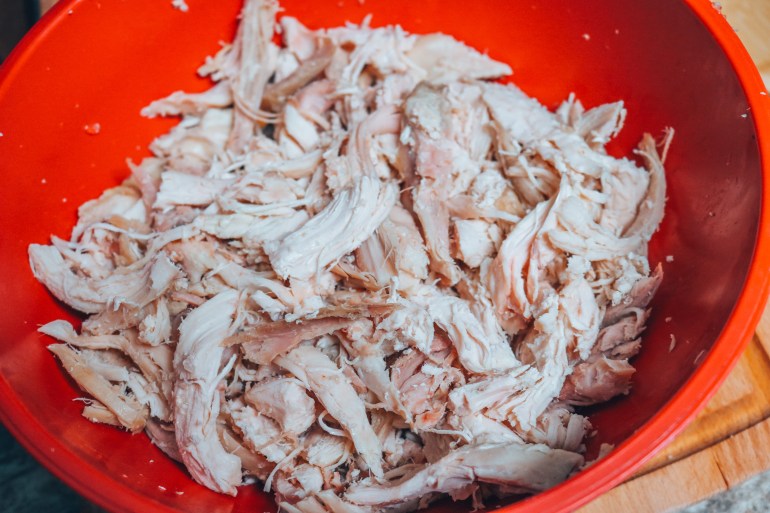
1 Rotisserie Chicken, both white and dark meat shredded [save bones to make broth]
1/4 Cup Craisins, finely diced
1/4 Cup Celery, finely diced
3 TBSP Olive Oil Mayo [to start, add more if needed]
1 TBSP Dill
Salt + Pepper
Let’s Get Cooking
Start off by taking all the meat off the chicken, shredding it along the way. If you’d like save the bones to make stock.
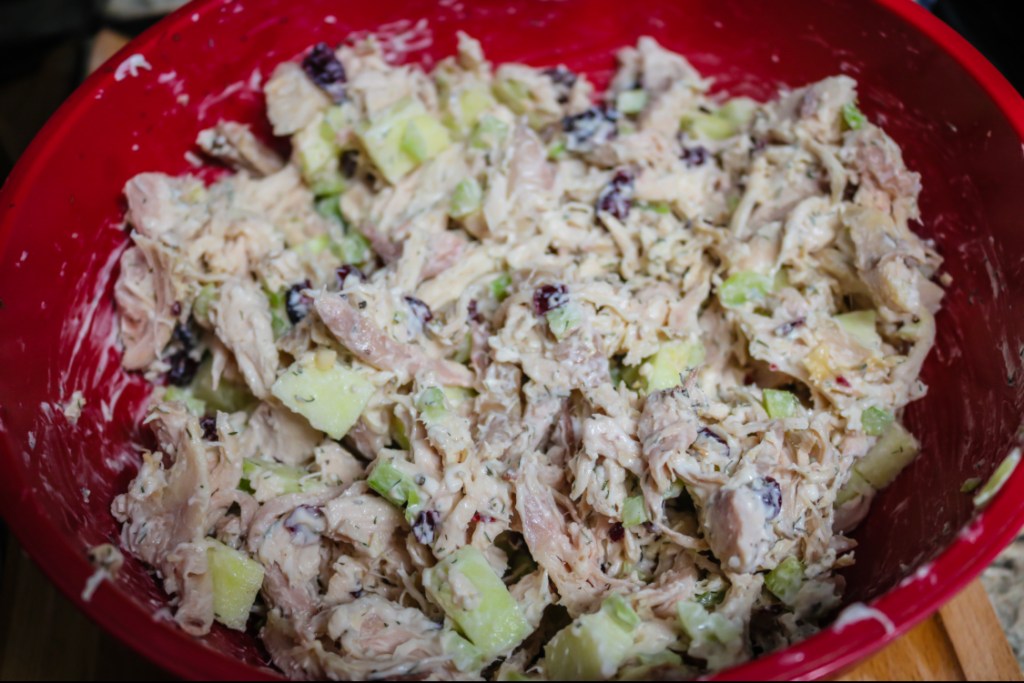
Dice the apple + celery + craisins and add in with the chicken.
Add in the mayo, stirring to make sure it is well incorporated.
Add in the dill + salt + pepper and mix. If needed add extra mayo now.
Now you have chicken salad!
Serve on a croissant, with crackers, I love it with potato chips as well.
We all love Claire Saffitz, right? High-key very happy she left Bon Appetit and the now madness that is that magazine. But that’s besides the point. I got her book Dessert Person for Christmas and finally got around to making one of her recipes. I decided to go with the Focaccia, it’s so crispy and warm and soft on the inside, UGH. I’d be lying if I said that I didn’t stand in front of the oven and try and eat it when it was still incredibly hot. It’s recommended that you have a stand mixer for this, I do not have one in my little apartment and it still turned out good; just have a strong arm on stand-by. Eat this on it’s own, slice in half for sandwich bread, do whatever you want with it really I don’t care, just enjoy it.
Ingredients
1 Package Active Dry Yeast
6 Cups/780g Bread Flour
2 TBSP/17g Kosher Salt
1/2 Cup/110g Extra Virgin Olive Oil + 1/4 Cup for topping and for oiling hands
First we are going to dissolve the yeast. In a small sauce pan, warm 1/2 cup water over low heat, just until it’s lukewarm, about 105F. Pour the water into the bowl of the stand mixer and whisk in the yeast to dissolve. Set this aside until the mixture is cloudy and slightly puffed, will take about 5 minutes.
Add 2 1/2 cups [567g] room-temp water to the yeast mixture + add in the flour and kosher salt. Using the dough hook, mix on the lowest speed until a loose dough comes together, for about a minute. Then increase the speed to med-high and mix until the dough is smooth and wrapping around the hook, about 5 minutes. Cover the bowl and allow the dough to rest for 10 minutes. Mix again on med-high speed, the dough should be smooth, elastic, and pulling away from the bowl, for about 10-15 minutes. ** THE DOUGH WILL BE STICKY**
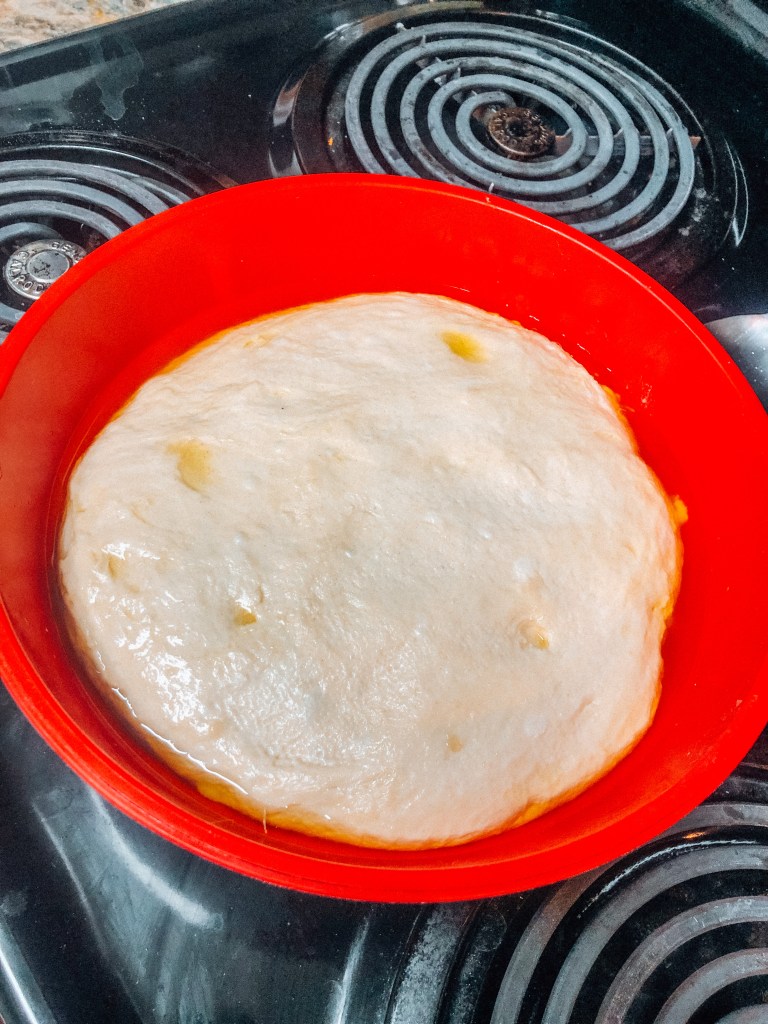
In a separate bowl, pour 1/4 cup of the oil into a separate large bowl and coat. Scrape the dough into the bowl and coat the dough. Take a photo before covering so you can gauge the rise. Cover with a damp towel and let rise for 1-1 1/2 hours.
BEFORE RISEAFTER RISE
While the dough is rising, prepare your toppings. For this recipe that involves crushing and chopping the garlic.
Drizzle 1/4 cup oil across a cookie sheet, coating the entire thing. With your oiled hands, slide your hand around either side of the dough and lift it out of the bowl. Let the dough weigh itself down back into the bowl. Rotate the bowl 90 degrees and repeat this process two more times. This allows the dough to rise more. Place the dough on the oiled baking sheet. Stretch the dough out in all directions, it’s not going to fully cover the pan yet, don’t stress. Cover and let sit for 15 minutes.
Uncover and stretch the dough again so it fits all the sides of the sheet. Cover again and let rise in the fridge for 24 hours. OR you can let is sit for another 40-55 minutes before cooking.
24 HOUR FRIDGE PROOF
Preheat the oven to 450F, place two oven racks on the highest and lowest positions. Uncover the risen dough with oiled hands and with wide hands, press your finger tips into the dough making dimples across the surface.
Top the focaccia as wanted: I added 1/4 cup olive oil+ chopped garlic + salt.
Bake on the lower rack for about 20-25 minutes and then transfer to the top rack until it begins to brown for about 5 minutes. Pay attention to the color here.
Let cool in the pan for about 10 minutes [hardest 10 minutes ever]. Scrape out with a spatula and let cool on a wire rack.
I freaking love hibachi, the food just tastes better when it’s made on a flat grill I guess. I have not been able to go to hibachi since this whole COVID thing so I figured I would try and tackle the challenge of making it at home. This is for a single serving, since I cook for one so if you need it for more people just bump up those numbers. It’s a super easy recipe and a lot less stressful than trying to catch broccoli in your mouth in front of all your friends and strangers.
Ingredients
1 Chicken Breast, cubed.
2 Garlic Cloves, diced
1/2 TSP Butter
Black Garlic Salt (optional)
Hot Sauce
Soy Sauce
1 egg, scrambled
1 Onion, cut into thick slices
Carrots, cut into match sticks
Sushi Rice, cooked by package instructions
Toppings: Yum Yum Sauce, Edamame
Let’s Get Cooking
I am not very good with measuring shit when I am free-handing it in the kitchen, I gotta get better at that. I apologize. Moving forward, start with cooking the sushi rice and let it cool.
While the rice is cooking, prep your veggies and cut the chicken. Heat a large pan and add the butter and about 3 TBSP of soy sauce. Once the butter is melted add in the chicken. Sprinkle with a little bit of the black garlic salt (if around) and add in the diced garlic + hot sauce. Cook until done and place into a separate bowl.
Place the chopped vegetables into the same pan you cooked the chicken in and cook until soft, feel free to add in a little more soy sauce and pepper. Once the veggies are done, add in the chicken and cooked rice. Make a well in the middle of the rice and add in the scrambled egg. Cook until done and then mix in with the rest of the rice.
Serve in a bowl with your fav toppings like, yum yum sauce, edamame, or whatever you’d like!
Everyone loves Mac + Cheese, it’s heaven in a bite. I have been in search of the best mac + cheese recipe, I need it to be overly cheesy, with strong flavors, and no soggy ass noodles. It looks like I finally found it! Recipe is from Stove Top Kisses, she has a wonderful video of the whole process on her page as well as so many other delicious recipes! Enough chit-chat let’s get into her recipe!
Ingredients
4 Cups Chicken Stock – enough to be able to boil your noodles in
1 Package of Elbow macaroni or whatever noodle you prefer
1 Stick of Butter, cut into smaller pieces
3/4 Cup Sour Cream
2 TSP Paprika
2 TSP Garlic Powder
2 TSP Onion Powder
1 TSP Salt + Pepper
1 Cup Cheddar Cheese + extra
1 Cup Mozzarella Cheese + extra
1 Cup Provolone Cheese + extra
3 Eggs
1 1/2 Cup Heavy Cream
2 Cups Whole Milk
Let’s Get Cooking
Preheat the oven to 375F
Cook the noodles in the chicken stock, cook just under al dente.
Drain the noodles and place into a large bowl. Add in the stick of butter [no one said this was healthy] + Sour Cream + Paprika + Garlic Powder + Onion Powder + Salt. Mix well in the bowl.
Then you’re going to add in the cheeses, again stirring well in the bowl so that everything is mixed. In a separate bowl mix together the heavy cream + milk + 3 eggs.
Get out your pan and place a layer of the noodle mixture in the dish. Then pour over about half of the milk mixture over top. Finally, place a layer of the 3 cheese over top. Repeat this layering process until you run out. Top off with a little extra paprika and pepper.
Bake in the oven for about 50 minutes and enjoy the absolute gooey goodness that is this mac + cheese. Thank Stove Top Kisses for this one, it’s to die for.